# Failed Appstore Activation
Source: https://superwhisper.com/docs/common-issues/appstore
How to Fix failed Appstore Activation.
## Restoring Your SuperWhisper Subscription
This guide applies only to users who purchased a SuperWhisper Subscription through the App Store on an iOS device.
Occasionally, the App Store may fail to properly activate your SuperWhisper iOS app. Follow these steps to resolve the issue:
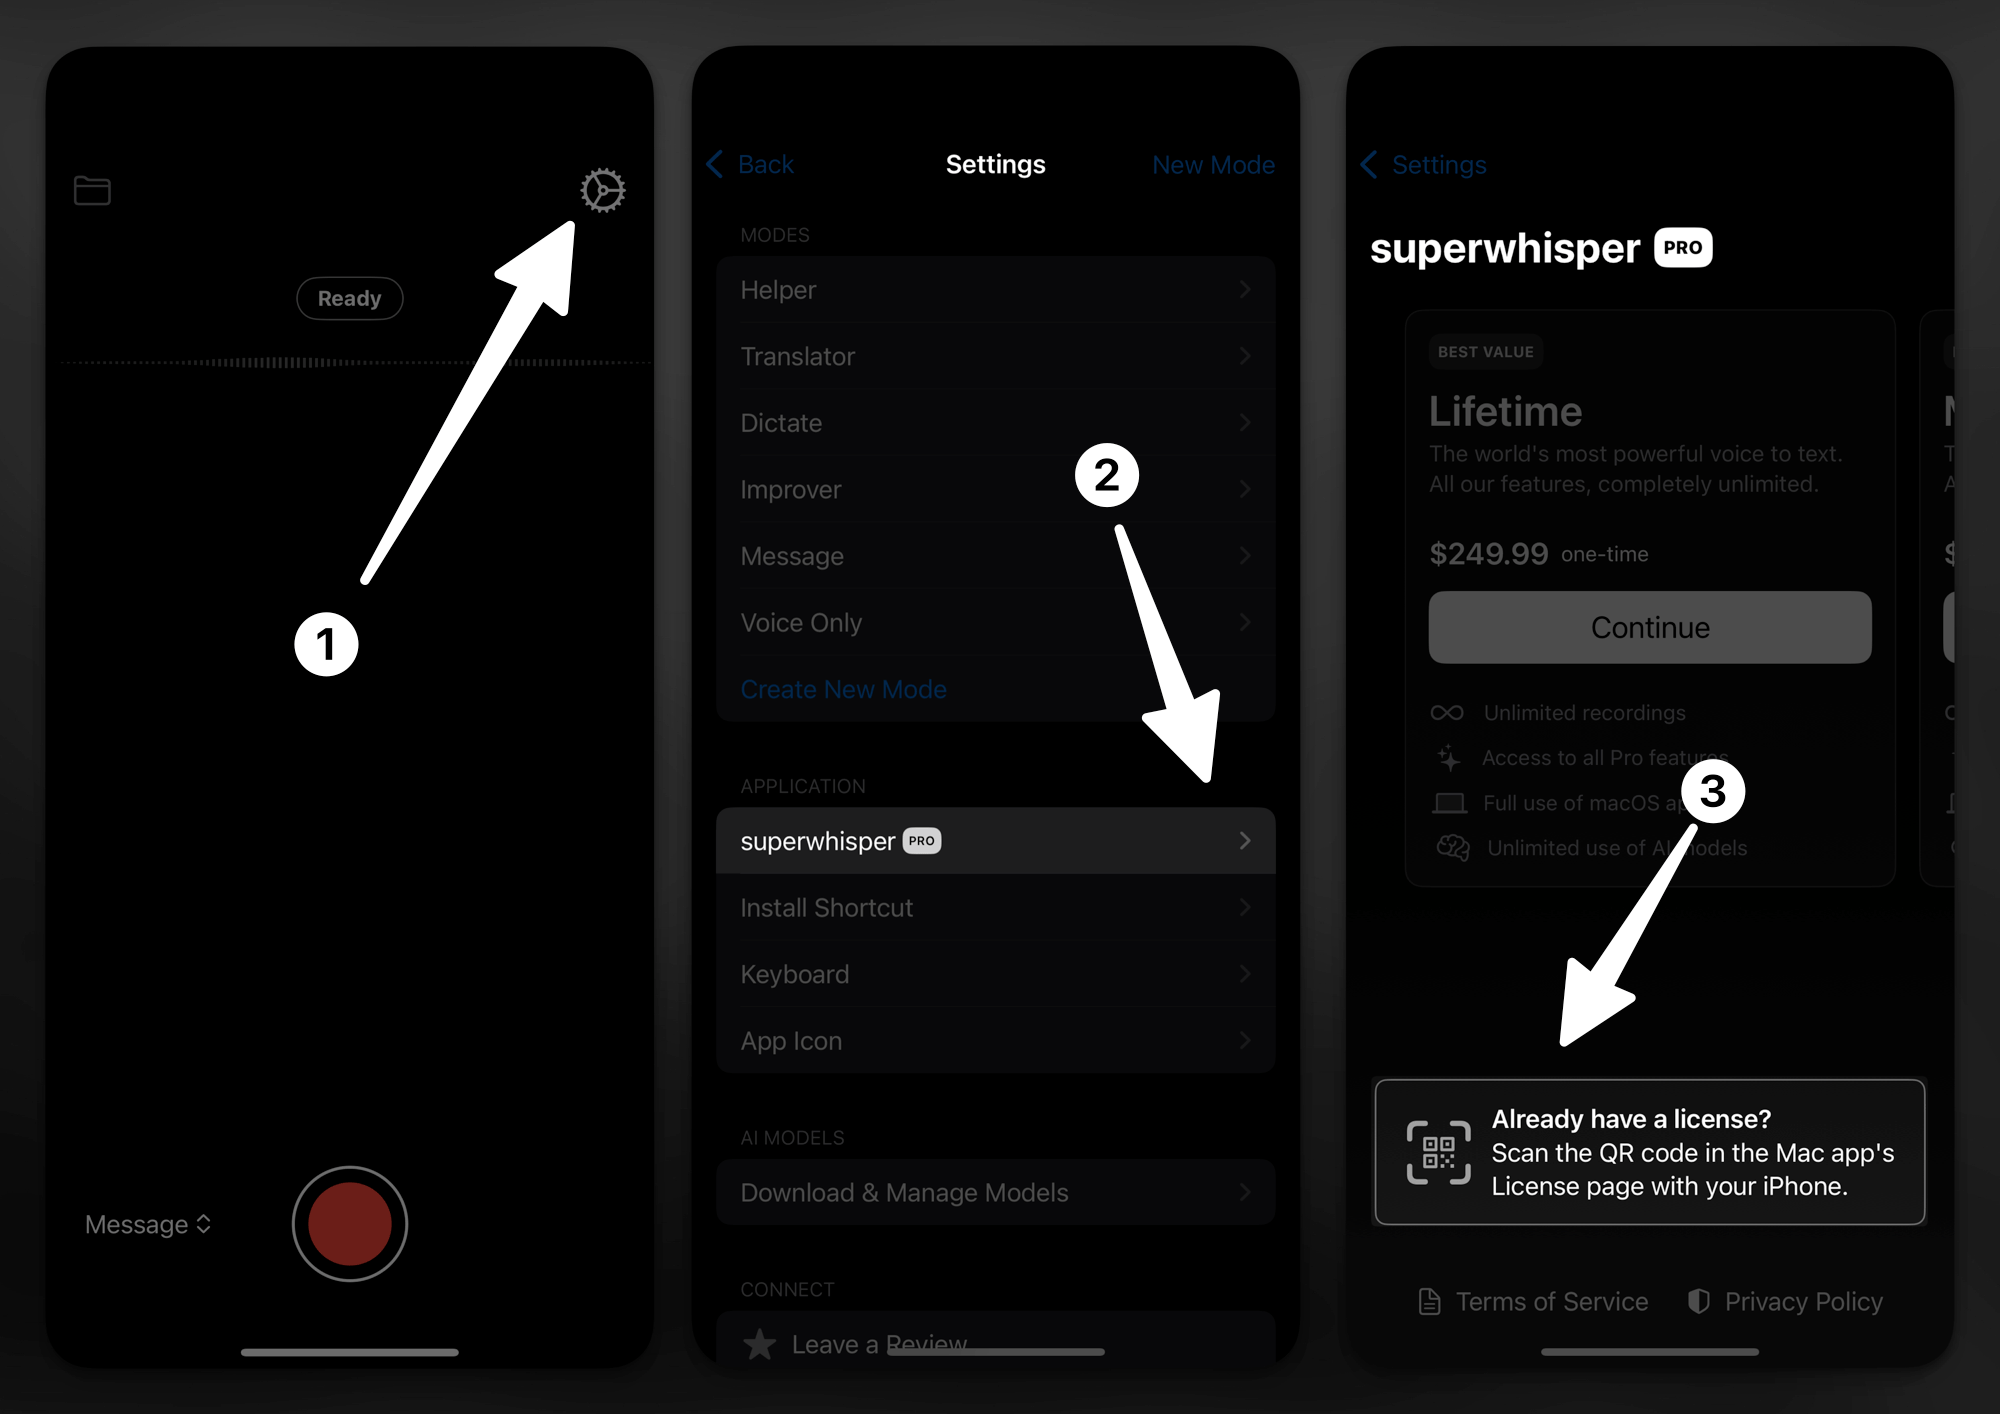
Launch SuperWhisper on your iPhone and tap the gear icon located in the top-right corner of the screen.
Navigate to the "SuperWhisper Pro" tab and tap to open it.
Tap the "Recover my License Key" button. This should reactivate your subscription.
 # Hallucinations and Silence Removal
Source: https://superwhisper.com/docs/common-issues/hallucinations
## What's the issue?
If you are noticing hallucinations or repetition at the end of your transcription, this is likely due to long periods of silence in your recorded audio.
## How to Fix it
To fix this, we are going to enable the Silence Removal feature.
First open the "Configuration" tab on the left.
Then enable "Advanced Settings." This will show you some new options.
Scroll down and enable the "Silence removal" option.
# Hallucinations and Silence Removal
Source: https://superwhisper.com/docs/common-issues/hallucinations
## What's the issue?
If you are noticing hallucinations or repetition at the end of your transcription, this is likely due to long periods of silence in your recorded audio.
## How to Fix it
To fix this, we are going to enable the Silence Removal feature.
First open the "Configuration" tab on the left.
Then enable "Advanced Settings." This will show you some new options.
Scroll down and enable the "Silence removal" option.
 This should help with the hallucinations and repetition.
# Realtime Unavailable
Source: https://superwhisper.com/docs/common-issues/realtime
## What's the issue?
The reason Realtime is grayed out is because it is only supported buy the Nova (Cloud) Voice model.
## How to Fix it
To enable Nova (Cloud), open Superwhisper settings and navigate to Voice model/Model and pick Nova (Cloud) from the drop down.
This should help with the hallucinations and repetition.
# Realtime Unavailable
Source: https://superwhisper.com/docs/common-issues/realtime
## What's the issue?
The reason Realtime is grayed out is because it is only supported buy the Nova (Cloud) Voice model.
## How to Fix it
To enable Nova (Cloud), open Superwhisper settings and navigate to Voice model/Model and pick Nova (Cloud) from the drop down.
 You can then enable the Realtime feature via the slider.
 Hope this page helped solve your issue. Cheers.
# Unable to Create Modes
Source: https://superwhisper.com/docs/common-issues/unable-to-create-mode
## What's the issue?
Sometimes when enabling ICloud Documents syncing, the Superwhisper folder moves to ICloud, but Superwhisper still thinks its in documents.
This causes Superwhisper to not be able to do things like create modes.
## How to Fix it
To fix this, we are going simply reselect documents as the folder location.
First open the "Configuration" tab on the left.
Then enable "Advanced Settings." This will show you some new options.
Scroll down and Click the "change folder" option.
Navigate to your Documents folder and click "open".
Now all you need to do is click "confirm" and you should be good to go!
Hope this page helped solve your issue. Cheers.
# Unable to Create Modes
Source: https://superwhisper.com/docs/common-issues/unable-to-create-mode
## What's the issue?
Sometimes when enabling ICloud Documents syncing, the Superwhisper folder moves to ICloud, but Superwhisper still thinks its in documents.
This causes Superwhisper to not be able to do things like create modes.
## How to Fix it
To fix this, we are going simply reselect documents as the folder location.
First open the "Configuration" tab on the left.
Then enable "Advanced Settings." This will show you some new options.
Scroll down and Click the "change folder" option.
Navigate to your Documents folder and click "open".
Now all you need to do is click "confirm" and you should be good to go!


 Hope this helped solve your issue and have a great rest of your day!
# iOS App Activation
Source: https://superwhisper.com/docs/get-started/activate-ios
Extend Superwhisper's powerful dictation capabilities to your mobile device with the iOS app.
## Step-by-Step
Get Superwhisper for iOS from the [App Store](https://apps.apple.com/us/app/superwhisper/id6471464415).
Once installed, open the iOS app and navigate to Settings. Look for the "superwhisper PRO" option, which allows you to activate your license on your mobile device.
Hope this helped solve your issue and have a great rest of your day!
# iOS App Activation
Source: https://superwhisper.com/docs/get-started/activate-ios
Extend Superwhisper's powerful dictation capabilities to your mobile device with the iOS app.
## Step-by-Step
Get Superwhisper for iOS from the [App Store](https://apps.apple.com/us/app/superwhisper/id6471464415).
Once installed, open the iOS app and navigate to Settings. Look for the "superwhisper PRO" option, which allows you to activate your license on your mobile device.
 To complete activation, you'll need to scan a QR code from your desktop app:
1. On your desktop app, go to Settings > License
2. Locate the mobile activation QR code
3. Use your iOS device to scan the displayed code
To complete activation, you'll need to scan a QR code from your desktop app:
1. On your desktop app, go to Settings > License
2. Locate the mobile activation QR code
3. Use your iOS device to scan the displayed code
 ***
## Troubleshooting
**Having trouble with the QR code? Here's a simple fix:**
1. Open the QR code screen on your Mac
2. Double-click your license key (you'll see "Copied to clipboard")
3. Create the activation link:
* Start with: `superwhisper://license/`
* Paste your key after the slash
* Example: `superwhisper://license/XXXXXXXX-XXXX-XXXX-XXXX-XXXXXXXXXXXX`
4. Open this link on your iOS device
This manual activation method works just as well as the QR code scan.
**Bought it though the app store and it wont activate?**
You can follow this guide to fix this issue [Here](https://superwhisper.mintlify.app/common-issues/appstore).
# MacOS App Activation
Source: https://superwhisper.com/docs/get-started/activate-mac
How to activate the MacOS app Via an iOS App Store Subscription.
## Step-by-Step
Get Superwhisper for MacOS from [Our Website](https://superwhisper.com/).
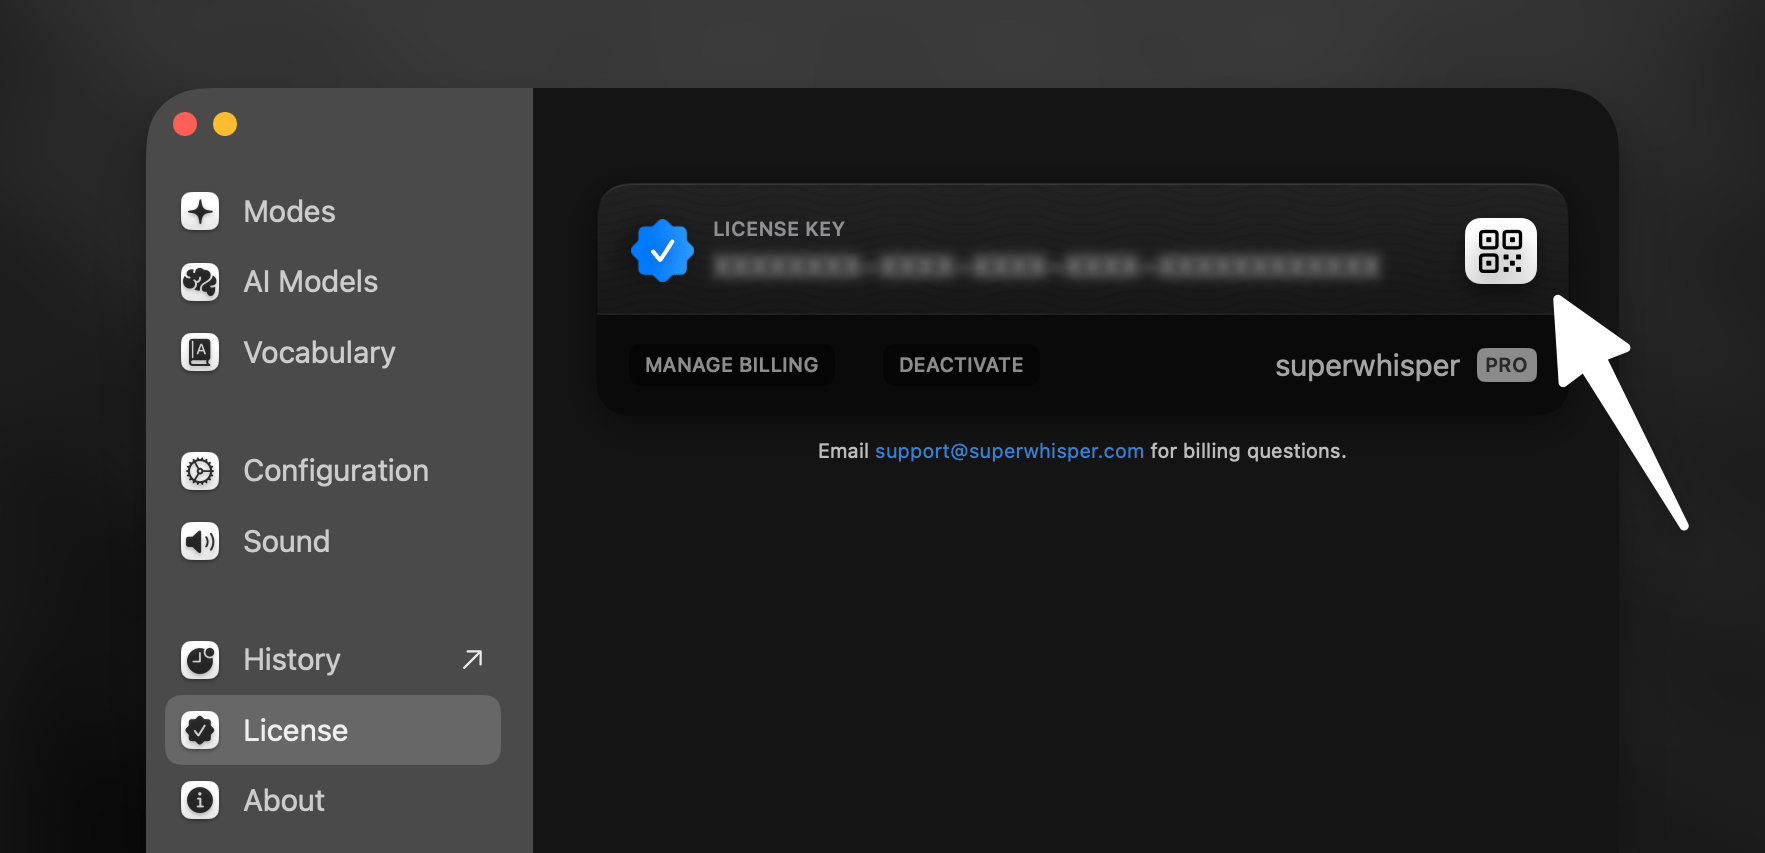
Once installed, open the MacOS app and navigate to [Settings](https://superwhisper.mintlify.app/get-started/settings). Look for the "License" tab.
***
## Troubleshooting
**Having trouble with the QR code? Here's a simple fix:**
1. Open the QR code screen on your Mac
2. Double-click your license key (you'll see "Copied to clipboard")
3. Create the activation link:
* Start with: `superwhisper://license/`
* Paste your key after the slash
* Example: `superwhisper://license/XXXXXXXX-XXXX-XXXX-XXXX-XXXXXXXXXXXX`
4. Open this link on your iOS device
This manual activation method works just as well as the QR code scan.
**Bought it though the app store and it wont activate?**
You can follow this guide to fix this issue [Here](https://superwhisper.mintlify.app/common-issues/appstore).
# MacOS App Activation
Source: https://superwhisper.com/docs/get-started/activate-mac
How to activate the MacOS app Via an iOS App Store Subscription.
## Step-by-Step
Get Superwhisper for MacOS from [Our Website](https://superwhisper.com/).
Once installed, open the MacOS app and navigate to [Settings](https://superwhisper.mintlify.app/get-started/settings). Look for the "License" tab.
 To complete activation, you'll need to copy the key from your iOS app.
1. On your iOS app, go to Settings > "Superwhisper Pro"
2. Locate the "Reveal License Key"
3. Tap it to reveal your key
4. You can then type this into the "License Key" Box on the MacOS app. Be sure to keep the upper case lettering.
To complete activation, you'll need to copy the key from your iOS app.
1. On your iOS app, go to Settings > "Superwhisper Pro"
2. Locate the "Reveal License Key"
3. Tap it to reveal your key
4. You can then type this into the "License Key" Box on the MacOS app. Be sure to keep the upper case lettering.
 If your iOS app is failing to activate you can follow this [Guide](https://superwhisper.mintlify.app/common-issues/appstore) to fix it.
# Introduction
Source: https://superwhisper.com/docs/get-started/introduction
Superwhisper: ultra-fast AI powered dictation that understands what you want to say and how you want to say it.
If your iOS app is failing to activate you can follow this [Guide](https://superwhisper.mintlify.app/common-issues/appstore) to fix it.
# Introduction
Source: https://superwhisper.com/docs/get-started/introduction
Superwhisper: ultra-fast AI powered dictation that understands what you want to say and how you want to say it.
 Instantly turn speech into perfect emails, crisp notes, clear messages, professional communication, and more.
## How It Works
Just talk as you normally would.
AI converts your speech into text with exceptional accuracy.
AI transforms your transcription to match exactly what you need.
***
## Key Features
Choose from built-in modes such as pure voice transcription, tailored text formatting, or create your own custom modes with personalized AI instructions. Each mode processes your dictation differently - from simple voice-to-text to complex transformations that match your exact requirements and workflow preferences.
When enabled, Superwhisper's context awareness understands your specific needs and delivers smarter, more personalized results.
Aside from dictation, Superwhisper can transform existing audio and video files into text. Perfect for processing lectures, meetings, or interviews.
Dictate in your preferred language and translate to English on the fly, use built-in modes in your language, or create custom modes to harness Superwhisper's capabilities across 100+ supported languages.
Superwhisper's flexibility extends beyond our built-in models. Integrate your own API keys to access additional AI providers and models, expanding your capabilities even further.
Experience unlimited access to powerful cloud & local AI models including OpenAI GPT-4o, Anthropic Claude 3.5 Sonnet, Deepgram Nova 2, Groq Llama 3.1, and more. Process dictations with state-of-the-art language models without worrying about usage limits or additional costs.
New users receive 15 minutes of free access to all pro features and the ability to create 3 modes to experience Superwhisper's full potential.
***
## Initial Setup
Instantly turn speech into perfect emails, crisp notes, clear messages, professional communication, and more.
## How It Works
Just talk as you normally would.
AI converts your speech into text with exceptional accuracy.
AI transforms your transcription to match exactly what you need.
***
## Key Features
Choose from built-in modes such as pure voice transcription, tailored text formatting, or create your own custom modes with personalized AI instructions. Each mode processes your dictation differently - from simple voice-to-text to complex transformations that match your exact requirements and workflow preferences.
When enabled, Superwhisper's context awareness understands your specific needs and delivers smarter, more personalized results.
Aside from dictation, Superwhisper can transform existing audio and video files into text. Perfect for processing lectures, meetings, or interviews.
Dictate in your preferred language and translate to English on the fly, use built-in modes in your language, or create custom modes to harness Superwhisper's capabilities across 100+ supported languages.
Superwhisper's flexibility extends beyond our built-in models. Integrate your own API keys to access additional AI providers and models, expanding your capabilities even further.
Experience unlimited access to powerful cloud & local AI models including OpenAI GPT-4o, Anthropic Claude 3.5 Sonnet, Deepgram Nova 2, Groq Llama 3.1, and more. Process dictations with state-of-the-art language models without worrying about usage limits or additional costs.
New users receive 15 minutes of free access to all pro features and the ability to create 3 modes to experience Superwhisper's full potential.
***
## Initial Setup
 **When you first launch Superwhisper, the onboarding process will help you:**
* Set up essential system permissions for dictation
* Choose your preferred language for transcription
* Select your AI model (cloud or local) with system-optimized suggestions
* Configure your microphone and audio settings
* Complete a guided first dictation with keyboard shortcuts
* Test and verify your setup is working correctly
**By the end of onboarding, you'll have completed the basic setup. To fine-tune Superwhisper for your specific needs, just click the menu bar icon to access all settings anytime.**
**When you first launch Superwhisper, the onboarding process will help you:**
* Set up essential system permissions for dictation
* Choose your preferred language for transcription
* Select your AI model (cloud or local) with system-optimized suggestions
* Configure your microphone and audio settings
* Complete a guided first dictation with keyboard shortcuts
* Test and verify your setup is working correctly
**By the end of onboarding, you'll have completed the basic setup. To fine-tune Superwhisper for your specific needs, just click the menu bar icon to access all settings anytime.**
 ***
## Explore More
Discover how to leverage different modes for maximum productivity
Need to use Superwhisper on files? Check this guide on file transcription methods
Find solutions to common questions
Help us improve by reporting any problems you encounter
Your license covers both desktop and iOS versions - giving you powerful AI dictation capabilities across all your devices at no additional cost. [Learn how to activate Superwhisper on iOS.](activate-ios)
# Report an Issue
Source: https://superwhisper.com/docs/get-started/report
Learn how to get help when Superwhisper isn't working as expected
## Overview
This guide outlines the essential information needed to report issues effectively, ensuring quick and accurate solutions for any challenges you encounter with Superwhisper.
For quick support, reach out at [support@superwhisper.com](mailto:support@superwhisper.com). You can also share your issue in [Superwhisper's Discord server](https://discord.gg/tF98XvJNvB), under the appropriate channel. While our Discord community often provide helpful advice, email support typically offers the fastest path to resolving your issue.
## Enable Error Reporting
Navigate to the configuration page in Superwhisper settings
Locate and enable the error log toggle switch
***
## Explore More
Discover how to leverage different modes for maximum productivity
Need to use Superwhisper on files? Check this guide on file transcription methods
Find solutions to common questions
Help us improve by reporting any problems you encounter
Your license covers both desktop and iOS versions - giving you powerful AI dictation capabilities across all your devices at no additional cost. [Learn how to activate Superwhisper on iOS.](activate-ios)
# Report an Issue
Source: https://superwhisper.com/docs/get-started/report
Learn how to get help when Superwhisper isn't working as expected
## Overview
This guide outlines the essential information needed to report issues effectively, ensuring quick and accurate solutions for any challenges you encounter with Superwhisper.
For quick support, reach out at [support@superwhisper.com](mailto:support@superwhisper.com). You can also share your issue in [Superwhisper's Discord server](https://discord.gg/tF98XvJNvB), under the appropriate channel. While our Discord community often provide helpful advice, email support typically offers the fastest path to resolving your issue.
## Enable Error Reporting
Navigate to the configuration page in Superwhisper settings
Locate and enable the error log toggle switch
 ## Reporting Through History
The most effective way to report issues related to recordings, is directly through Superwhisper's history.
Click the menu icon in Superwhisper and select "History"
## Reporting Through History
The most effective way to report issues related to recordings, is directly through Superwhisper's history.
Click the menu icon in Superwhisper and select "History"
 Find the problematic recording in the left sidebar and right-click to select "Report Issue"
 ## Manual Reporting via Email
As an alternative method you can submit issues manually via email. Here's what to include:
### Required Screenshots
## Manual Reporting via Email
As an alternative method you can submit issues manually via email. Here's what to include:
### Required Screenshots

 If you're using a Custom Mode, include a screenshot of your prompt configuration
 ### Collecting Test Recording Data
Make a brief recording demonstrating the issue
From within the history panel, select the test recording and reveal its folder in Finder
### Collecting Test Recording Data
Make a brief recording demonstrating the issue
From within the history panel, select the test recording and reveal its folder in Finder
 Compress the selected folder and attach it to your email along with the screenshots
 ***
Whichever method you choose, remember to provide a clear description of the issue and include any steps necessary to reproduce the problem.
# Open Settings
Source: https://superwhisper.com/docs/get-started/settings
How to Open Settings.
There are two ways to open settings.
Up in your toolbar near the wifi symbol, there should be a Superwhisper Logo.
When you click on it, a list of options should appear.
Go down to settings and click to open. Just like that, settings should be open!
When you have the SuperWhisper dictation window open, click on the window to engage it and press the ⌘ and , keys to open settings.
This should then open the settings window!
Have a great day!
# Advanced Settings
Source: https://superwhisper.com/docs/get-started/settings-advanced
Superwhisper's advanced configuration options let you modify application behavior, adjust performance settings, and manage system-level preferences for a personalized dictation experience
***
Whichever method you choose, remember to provide a clear description of the issue and include any steps necessary to reproduce the problem.
# Open Settings
Source: https://superwhisper.com/docs/get-started/settings
How to Open Settings.
There are two ways to open settings.
Up in your toolbar near the wifi symbol, there should be a Superwhisper Logo.
When you click on it, a list of options should appear.
Go down to settings and click to open. Just like that, settings should be open!
When you have the SuperWhisper dictation window open, click on the window to engage it and press the ⌘ and , keys to open settings.
This should then open the settings window!
Have a great day!
# Advanced Settings
Source: https://superwhisper.com/docs/get-started/settings-advanced
Superwhisper's advanced configuration options let you modify application behavior, adjust performance settings, and manage system-level preferences for a personalized dictation experience
 Superwhisper's advanced configuration options let you modify application behavior, adjust performance settings, and manage system-level preferences for a personalized dictation experience.
***
## Interface Customization
Superwhisper's advanced configuration options let you modify application behavior, adjust performance settings, and manage system-level preferences for a personalized dictation experience.
***
## Interface Customization
 ### Show in Dock
Control whether Superwhisper appears in your dock for quick access
### Start Recording on Menubar Click
Enabling this toggle will allow you to start or stop your recording by clicking on the menu icon. If you want to access the regular options from the menu bar icon, you will just simply right click on it.
### Recording Window Enabled
If you prefer to stay focused on your work without visual distractions, you can disable the recording window. Audio cues will still notify you when recording starts and when processing completes.
### Auto-Close Window
By default, with recording window and paste result enabled, the window closes only after successful paste detection. Enable this setting to automatically close the Recording Window after every dictation, regardless of paste status. Your dictated text remains in the clipboard for manual pasting if needed.
***
## Voice Processing Options
### Show in Dock
Control whether Superwhisper appears in your dock for quick access
### Start Recording on Menubar Click
Enabling this toggle will allow you to start or stop your recording by clicking on the menu icon. If you want to access the regular options from the menu bar icon, you will just simply right click on it.
### Recording Window Enabled
If you prefer to stay focused on your work without visual distractions, you can disable the recording window. Audio cues will still notify you when recording starts and when processing completes.
### Auto-Close Window
By default, with recording window and paste result enabled, the window closes only after successful paste detection. Enable this setting to automatically close the Recording Window after every dictation, regardless of paste status. Your dictated text remains in the clipboard for manual pasting if needed.
***
## Voice Processing Options
 ### Voice Model Active Duration
Adjust the active duration of voice processing to balance between speed and resource usage. Higher durations keep the AI model loaded in system memory, enabling faster initial processing but reducing available resources for other applications. Lower durations free up system memory but may require additional time when starting new dictation sessions.
### Silence Removal
Silence removal helps you get better transcripts and faster results by skipping quiet parts in your audio. Additionally, this feature is helpful in the prevention of AI hallucinations during silent moments. If you see text you never said in your transcripts, turning on silence removal may fix this by stopping the AI from trying to make sense of silence.
***
## Folder Location
### Voice Model Active Duration
Adjust the active duration of voice processing to balance between speed and resource usage. Higher durations keep the AI model loaded in system memory, enabling faster initial processing but reducing available resources for other applications. Lower durations free up system memory but may require additional time when starting new dictation sessions.
### Silence Removal
Silence removal helps you get better transcripts and faster results by skipping quiet parts in your audio. Additionally, this feature is helpful in the prevention of AI hallucinations during silent moments. If you see text you never said in your transcripts, turning on silence removal may fix this by stopping the AI from trying to make sense of silence.
***
## Folder Location
 Superwhisper keeps configuration files in your Documents folder by default. This folder stores your history files, your custom modes settings, vocabulary, and text replacements. **Creating a backup of this folder is recommended if you want to preserve your personalized configurations or transfer them to a new machine.**
Since Superwhisper actively uses this folder during dictation, ensure it remains locally accessible on your device. If using iCloud sync for your Documents folder, verify that this specific folder remains local to prevent operational issues.
***
## Text Processing Controls
Superwhisper keeps configuration files in your Documents folder by default. This folder stores your history files, your custom modes settings, vocabulary, and text replacements. **Creating a backup of this folder is recommended if you want to preserve your personalized configurations or transfer them to a new machine.**
Since Superwhisper actively uses this folder during dictation, ensure it remains locally accessible on your device. If using iCloud sync for your Documents folder, verify that this specific folder remains local to prevent operational issues.
***
## Text Processing Controls
 ### Paste Result Text
This toggle works in conjunction with the recording window settings to determine how Superwhisper delivers transcription results. Keep in mind that if you disable both the recording window and paste result options, Superwhisper will still save the results to your clipboard - you'll just need to paste it manually since you won't see the text on screen.
### Hold Shift to Auto-Send
With this option enabled, holding the shift key when you finish your dictation automatically simulates pressing the return/enter key. This feature is particularly useful for quick messages in chat applications or cases where immediate action is desired.
### Restore Clipboard
By default, your results will replace whatever was on your clipboard before dictating. When you turn on this toggle, Superwhisper will put your previous clipboard content back exactly as it was.
### Simulate Keypresses
This option provides an alternative input method for applications where direct paste operations aren't possible due to system privacy settings or application restrictions. When enabled, Superwhisper simulates individual keystrokes to input your results.
# Overview
Source: https://superwhisper.com/docs/get-started/settings-overview
Learn how to personalize Superwhisper's settings and options to enhance your voice-to-text experience and maximize productivity
**Superwhisper is designed to work excellently right out of the box, so if you've completed the initial onboarding, you're already set to start dictating.** While the default configuration suits most users perfectly, one of Superwhisper's greatest strengths is its customization potential.
Superwhisper offers a wide range of customization options to help you create the perfect dictation environment. From basic audio settings to advanced configuration options, you can tailor the application to match your specific needs and workflow preferences.
***
## Configuration Areas
Adjust your microphone and sound settings for effective voice capture
Set your preferred keyboard shortcuts for a smooth, effortless dictation
Take control of how Superwhisper works. Customize the behavior of your recording window, tweak settings to boost performance, and discover more settings to unlock Superwhisper's full potential for your workflow
# Keyboard Shortcuts
Source: https://superwhisper.com/docs/get-started/settings-shortcuts
Customize your keyboard shortcuts to control your dictation efficiently and enhance your productivity with quick commands
### Paste Result Text
This toggle works in conjunction with the recording window settings to determine how Superwhisper delivers transcription results. Keep in mind that if you disable both the recording window and paste result options, Superwhisper will still save the results to your clipboard - you'll just need to paste it manually since you won't see the text on screen.
### Hold Shift to Auto-Send
With this option enabled, holding the shift key when you finish your dictation automatically simulates pressing the return/enter key. This feature is particularly useful for quick messages in chat applications or cases where immediate action is desired.
### Restore Clipboard
By default, your results will replace whatever was on your clipboard before dictating. When you turn on this toggle, Superwhisper will put your previous clipboard content back exactly as it was.
### Simulate Keypresses
This option provides an alternative input method for applications where direct paste operations aren't possible due to system privacy settings or application restrictions. When enabled, Superwhisper simulates individual keystrokes to input your results.
# Overview
Source: https://superwhisper.com/docs/get-started/settings-overview
Learn how to personalize Superwhisper's settings and options to enhance your voice-to-text experience and maximize productivity
**Superwhisper is designed to work excellently right out of the box, so if you've completed the initial onboarding, you're already set to start dictating.** While the default configuration suits most users perfectly, one of Superwhisper's greatest strengths is its customization potential.
Superwhisper offers a wide range of customization options to help you create the perfect dictation environment. From basic audio settings to advanced configuration options, you can tailor the application to match your specific needs and workflow preferences.
***
## Configuration Areas
Adjust your microphone and sound settings for effective voice capture
Set your preferred keyboard shortcuts for a smooth, effortless dictation
Take control of how Superwhisper works. Customize the behavior of your recording window, tweak settings to boost performance, and discover more settings to unlock Superwhisper's full potential for your workflow
# Keyboard Shortcuts
Source: https://superwhisper.com/docs/get-started/settings-shortcuts
Customize your keyboard shortcuts to control your dictation efficiently and enhance your productivity with quick commands
 Access the Keyboard Shortcuts section in Superwhisper's Configuration tab. Each shortcut can be modified to avoid conflicts with other applications and create a workflow that feels natural to you.
***
## Toggle Recording
Set up a keyboard combination to start and stop your recordings. Single modifier keys (like Left Command, Right Command, or Fn key) can be used independently, providing additional flexibility in your shortcut configuration.
***
## Cancel Recording
This command allows you to cancel an active recording:
* For recordings under 30 seconds: Cancels immediately
* For longer recordings: Shows a confirmation prompt to prevent accidental cancellations
After completing your recording, your dictation enters the processing stage. During this time, using the cancel shortcut will only hide the recording window.
***
## Change Mode
This keyboard shortcut allows you to switch between different modes:
* Hold your chosen modifier key and tap the assigned key to cycle through modes
* Only works when the recording window is active
* Make sure to select your mode before starting dictation
***
## Push-to-Talk
Enables precise control over your recording sessions:
* Press and hold to record
* Release to stop recording
* Can share the same shortcut as Toggle Recording
If you're setting up a shared shortcut for Push-to-Talk and Toggle Recording, try pressing the main key before adding modifier keys if you encounter configuration issues.
***
## Explore More
Discover more ways to switch modes in Superwhisper. Use auto-activation rules, deep links, or automation tools - ideal for power users looking to enhance their workflow.
# Sound
Source: https://superwhisper.com/docs/get-started/settings-sound
Configure your audio settings for optimal dictation performance
Access the Keyboard Shortcuts section in Superwhisper's Configuration tab. Each shortcut can be modified to avoid conflicts with other applications and create a workflow that feels natural to you.
***
## Toggle Recording
Set up a keyboard combination to start and stop your recordings. Single modifier keys (like Left Command, Right Command, or Fn key) can be used independently, providing additional flexibility in your shortcut configuration.
***
## Cancel Recording
This command allows you to cancel an active recording:
* For recordings under 30 seconds: Cancels immediately
* For longer recordings: Shows a confirmation prompt to prevent accidental cancellations
After completing your recording, your dictation enters the processing stage. During this time, using the cancel shortcut will only hide the recording window.
***
## Change Mode
This keyboard shortcut allows you to switch between different modes:
* Hold your chosen modifier key and tap the assigned key to cycle through modes
* Only works when the recording window is active
* Make sure to select your mode before starting dictation
***
## Push-to-Talk
Enables precise control over your recording sessions:
* Press and hold to record
* Release to stop recording
* Can share the same shortcut as Toggle Recording
If you're setting up a shared shortcut for Push-to-Talk and Toggle Recording, try pressing the main key before adding modifier keys if you encounter configuration issues.
***
## Explore More
Discover more ways to switch modes in Superwhisper. Use auto-activation rules, deep links, or automation tools - ideal for power users looking to enhance their workflow.
# Sound
Source: https://superwhisper.com/docs/get-started/settings-sound
Configure your audio settings for optimal dictation performance
 ## Input Device
Your dictation quality depends on having the right audio settings. Superwhisper's sound configuration lets you pick your microphone, set optimal volume levels, and customize how it works on your particular audio setup.
Choose your preferred audio input or let Superwhisper automatically select based on system defaults. The automatic option ensures Superwhisper always uses your system's primary input device.
Enable automatic volume adjustment (recommended) to set your microphone's input level for clear voice recordings. This ensures your voice is captured at the right volume without manual adjustments.
Not all microphones or devices are compatible with the new audio engine. If you experience audio capture issues, try disabling this option before reporting an issue.
Want faster processing and better results with your transcription? Check out the silence removal setting in Advanced Configuration.
***
## Sound Effects
**Superwhisper includes customizable audio feedback to enhance your dictation experience.** These subtle cues help you stay informed about the application's status without needing to watch the screen. You can adjust the volume of sound effects independently from your system volume, or disable them completely if you prefer silent operation.
A quick audio cue lets you know when your dictation can begin
A brief tone signals when your dictation has been processed
# How to Transcribe from History or from a File
Source: https://superwhisper.com/docs/get-started/transcribe-history
## Why Transcribe from History?
Transcribing from history offers several advantages.
If a file fails to transcribe or the app crashes, you can still use the recording to generate your text output.
Additionally, you might want to transcribe from history if you wish to adjust the mode settings or switch to an entirely different mode.
## How to Transcribe from History
Open the app settings window, and click the History tab on the left.
## Input Device
Your dictation quality depends on having the right audio settings. Superwhisper's sound configuration lets you pick your microphone, set optimal volume levels, and customize how it works on your particular audio setup.
Choose your preferred audio input or let Superwhisper automatically select based on system defaults. The automatic option ensures Superwhisper always uses your system's primary input device.
Enable automatic volume adjustment (recommended) to set your microphone's input level for clear voice recordings. This ensures your voice is captured at the right volume without manual adjustments.
Not all microphones or devices are compatible with the new audio engine. If you experience audio capture issues, try disabling this option before reporting an issue.
Want faster processing and better results with your transcription? Check out the silence removal setting in Advanced Configuration.
***
## Sound Effects
**Superwhisper includes customizable audio feedback to enhance your dictation experience.** These subtle cues help you stay informed about the application's status without needing to watch the screen. You can adjust the volume of sound effects independently from your system volume, or disable them completely if you prefer silent operation.
A quick audio cue lets you know when your dictation can begin
A brief tone signals when your dictation has been processed
# How to Transcribe from History or from a File
Source: https://superwhisper.com/docs/get-started/transcribe-history
## Why Transcribe from History?
Transcribing from history offers several advantages.
If a file fails to transcribe or the app crashes, you can still use the recording to generate your text output.
Additionally, you might want to transcribe from history if you wish to adjust the mode settings or switch to an entirely different mode.
## How to Transcribe from History
Open the app settings window, and click the History tab on the left.
 In History, right-click on any recording you want to re-transcribe and select "Process again."
If you want to try something different with your audio recording, you can use a different mode.
In History, right-click on any recording you want to re-transcribe and select "Process again."
If you want to try something different with your audio recording, you can use a different mode.
 ## How to Transcribe a File
To transcribe an audio file from your computer, first go to your toolbar and click "Transcribe file..."
This icon appears in the toolbar, located in the top-right corner of your Mac screen, alongside the Wi-Fi indicator and clock.
## How to Transcribe a File
To transcribe an audio file from your computer, first go to your toolbar and click "Transcribe file..."
This icon appears in the toolbar, located in the top-right corner of your Mac screen, alongside the Wi-Fi indicator and clock.
 This will open a window where you can select your audio file.
 These simple steps allow you to re-transcribe from history or transcribe any audio file with ease!
# Custom
Source: https://superwhisper.com/docs/modes/custom
Take full control of your dictation processing with Custom Mode. Create specialized workflows by combining context-awareness with your own AI instructions for unlimited possibilities.
These simple steps allow you to re-transcribe from history or transcribe any audio file with ease!
# Custom
Source: https://superwhisper.com/docs/modes/custom
Take full control of your dictation processing with Custom Mode. Create specialized workflows by combining context-awareness with your own AI instructions for unlimited possibilities.
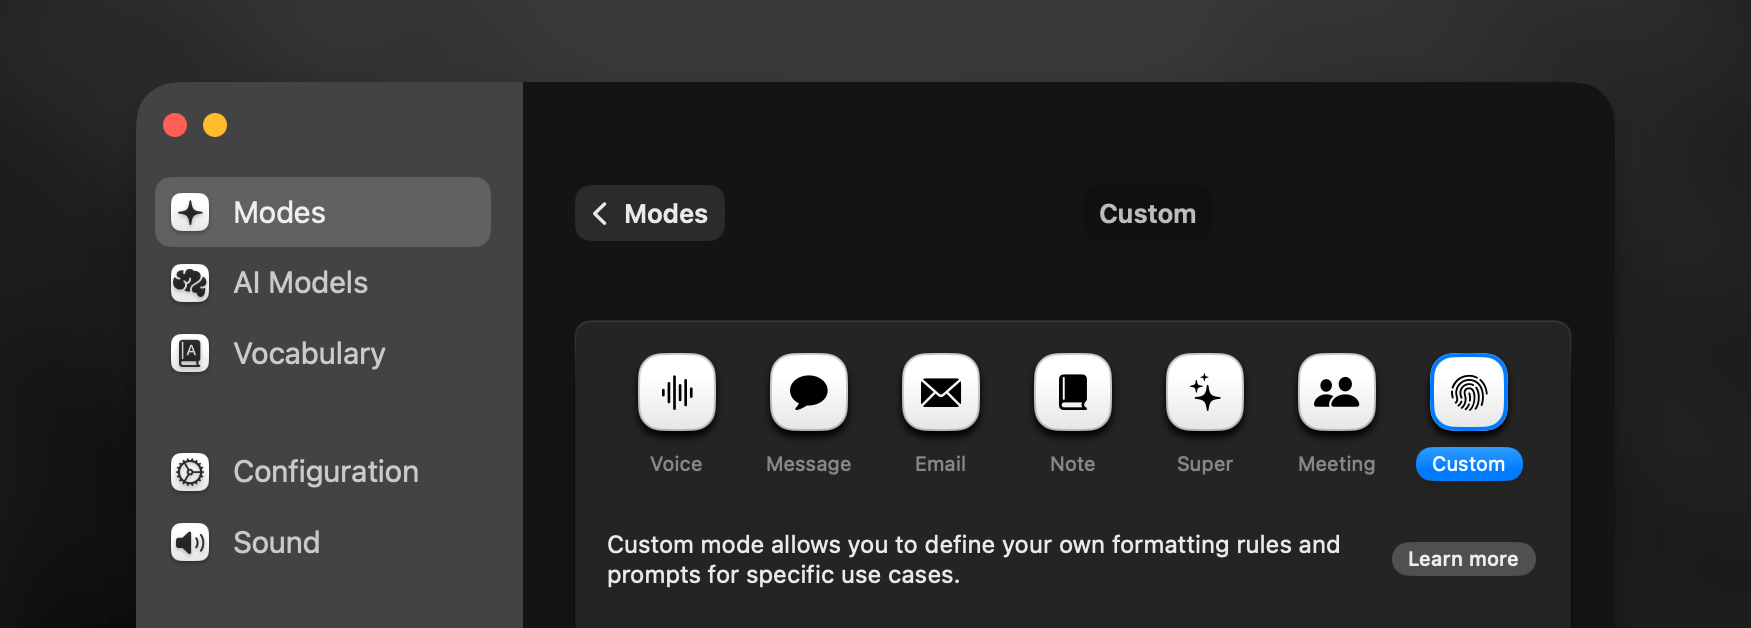 ## Key Features
**Custom Mode empowers you with:**
* Complete control over AI processing instructions
* Context-awareness capabilities
* Advanced audio capture options
* Flexible processing for any workflow
***
## Additional Settings
### AI Instructions
Beyond selecting your preferred AI model, with Custom Mode you have the option to personalize your own AI processing instructions.
## Key Features
**Custom Mode empowers you with:**
* Complete control over AI processing instructions
* Context-awareness capabilities
* Advanced audio capture options
* Flexible processing for any workflow
***
## Additional Settings
### AI Instructions
Beyond selecting your preferred AI model, with Custom Mode you have the option to personalize your own AI processing instructions.
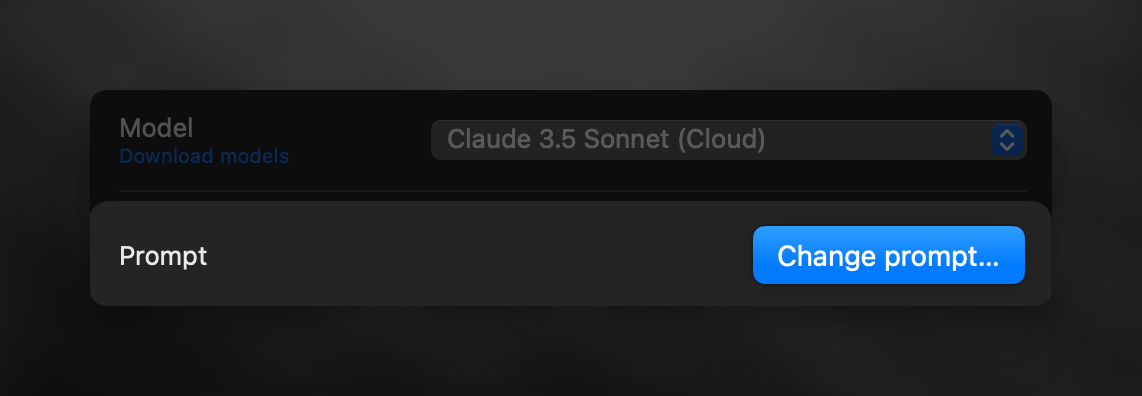 Instructions are empty by default. Select "Change Prompt" to modify them. If left blank, AI will not know what task to perform and may give unexpected results.
### Audio Options
Instructions are empty by default. Select "Change Prompt" to modify them. If left blank, AI will not know what task to perform and may give unexpected results.
### Audio Options
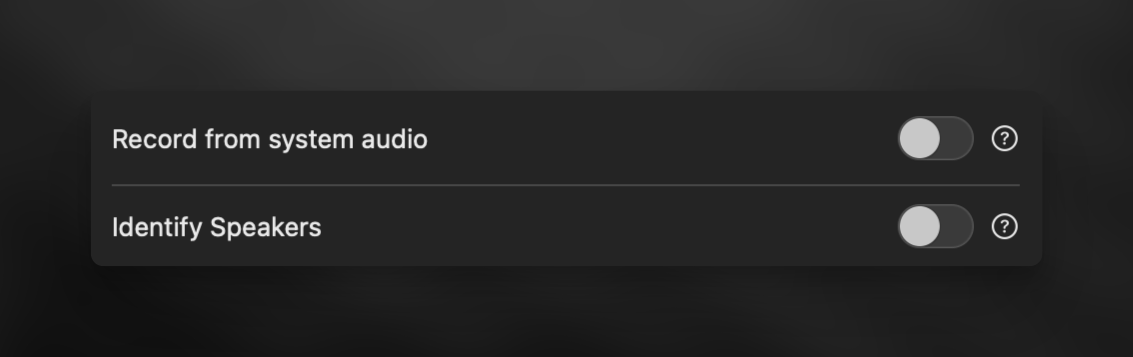 * **Record from System Audio:**
* Perfect for meetings, video content, interviews, or live audio coming your speakers
* When recording system audio, the waves on the recording window do not move. You can always check Superwhisper's history to verify capture
* **Identify Speakers**
* Useful for meeting transcriptions
* Speaker separation results appear in the Segments tab of History
Speaker-separated transcripts won't process through AI automatically within the same mode. See [this guide](speaker-separated-meetings) on handling multi-speaker transcripts with AI processing.
### Context Awareness
* **Record from System Audio:**
* Perfect for meetings, video content, interviews, or live audio coming your speakers
* When recording system audio, the waves on the recording window do not move. You can always check Superwhisper's history to verify capture
* **Identify Speakers**
* Useful for meeting transcriptions
* Speaker separation results appear in the Segments tab of History
Speaker-separated transcripts won't process through AI automatically within the same mode. See [this guide](speaker-separated-meetings) on handling multi-speaker transcripts with AI processing.
### Context Awareness
 Inside the Change Prompt section, you'll discover two powerful features:
* Use application context toggle
* Use copied text toggle
These toggles work identically to [Super Mode context awareness features](super#context-awareness).
***
## Prompting Tips
**When writing AI instructions for use in Superwhisper, you can direct AI's attention to specific content using these XML-style tags:**
* ``
* Contains your dictated text
* ``
* Includes the data from your active application window
* ``
* Contains the text you've copied
***
T**hese tags let you create targeted instructions for AI**. For example:
* "Translate `` to Spanish"
* "Based on ``, suggest relevant code comments"
* "Format `` accordingly based on the content found in ``"
If you want AI to know your input is dictated speech, include it explicitly. For example: *"The `` contains dictated text. Please format it into proper paragraphs."*
***
**Instruct AI exactly which content to focus on and what to do with it.** You can combine them in your instructions to create powerful workflows:
```
If shows a code editor:
- Format as code comments
- Use coding style from as reference
```
Define your AI instructions by starting with a clear role or purpose statement. This sets the foundation for how the AI will process your content.
Create a detailed list of specific requirements and expectations. Being explicit helps ensure the AI understands exactly what you need.
Organize your instructions using separate sections for different components. This modular approach makes your instructions easier to understand and modify.
Write direct, straightforward instructions without unnecessary complexity. Clear communication leads to better results.
**It is suggested to structure your instructions with XML tags to communicate clearly with AI:**
**Basic Tag Structure**
* Set a role and Instructions:
```xml
You are a text editor
Format the content of `` into clear paragraphs
```
* Define specific requirements:
```xml
- Use simple, clear language
- Keep the casual tone
- Break into short paragraphs
```
* Provide context and style:
```xml
- This content is for a cooking blog post
- Target audience is home cooks
- Should use casual, approachable language
- Include cooking-specific terminology where relevant
- Title and introduction
- Ingredient list
- Step-by-step instructions
- Cook's notes and tips
```
Adjust and expand your XML tags based on your specific needs. The more detailed your instructions, the better the results.
**Examples help you teach AI exactly how to process your input and what kind of output you expect.** Located at the bottom of the Change Prompt section, below the context toggles, you'll find the Add Examples interface.
Inside the Change Prompt section, you'll discover two powerful features:
* Use application context toggle
* Use copied text toggle
These toggles work identically to [Super Mode context awareness features](super#context-awareness).
***
## Prompting Tips
**When writing AI instructions for use in Superwhisper, you can direct AI's attention to specific content using these XML-style tags:**
* ``
* Contains your dictated text
* ``
* Includes the data from your active application window
* ``
* Contains the text you've copied
***
T**hese tags let you create targeted instructions for AI**. For example:
* "Translate `` to Spanish"
* "Based on ``, suggest relevant code comments"
* "Format `` accordingly based on the content found in ``"
If you want AI to know your input is dictated speech, include it explicitly. For example: *"The `` contains dictated text. Please format it into proper paragraphs."*
***
**Instruct AI exactly which content to focus on and what to do with it.** You can combine them in your instructions to create powerful workflows:
```
If shows a code editor:
- Format as code comments
- Use coding style from as reference
```
Define your AI instructions by starting with a clear role or purpose statement. This sets the foundation for how the AI will process your content.
Create a detailed list of specific requirements and expectations. Being explicit helps ensure the AI understands exactly what you need.
Organize your instructions using separate sections for different components. This modular approach makes your instructions easier to understand and modify.
Write direct, straightforward instructions without unnecessary complexity. Clear communication leads to better results.
**It is suggested to structure your instructions with XML tags to communicate clearly with AI:**
**Basic Tag Structure**
* Set a role and Instructions:
```xml
You are a text editor
Format the content of `` into clear paragraphs
```
* Define specific requirements:
```xml
- Use simple, clear language
- Keep the casual tone
- Break into short paragraphs
```
* Provide context and style:
```xml
- This content is for a cooking blog post
- Target audience is home cooks
- Should use casual, approachable language
- Include cooking-specific terminology where relevant
- Title and introduction
- Ingredient list
- Step-by-step instructions
- Cook's notes and tips
```
Adjust and expand your XML tags based on your specific needs. The more detailed your instructions, the better the results.
**Examples help you teach AI exactly how to process your input and what kind of output you expect.** Located at the bottom of the Change Prompt section, below the context toggles, you'll find the Add Examples interface.
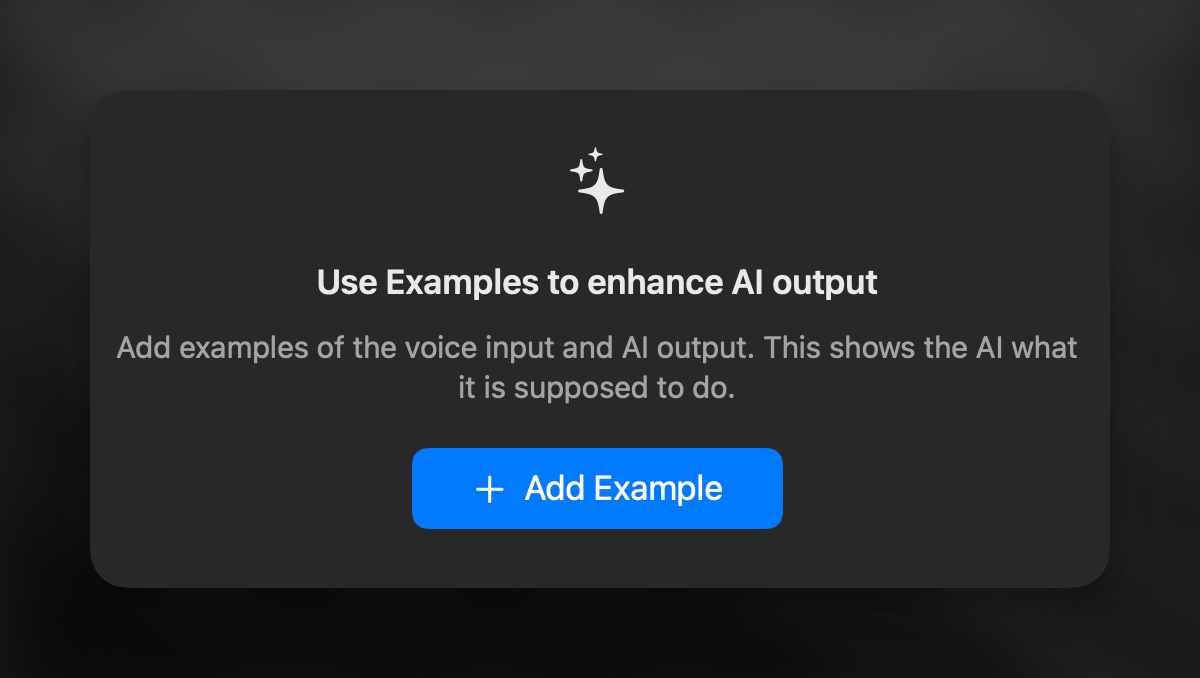 **Each example consists of two parts:**
* Input field: Shows how you'll phrase your requests
* Output field: Demonstrates your expected AI response
**How to set:**
* Click "Add Example" to create your first example pair
* Fill in both the input and output fields
* Add more examples by clicking "Add Example" again
* Right-click any example to duplicate or delete it
Adding 2-3 examples significantly improves AI's understanding of your needs and leads to more accurate responses.
***
## Advanced Tip
Currently, Custom Mode doesn't include text selection context like [Super Mode](super). Enable this by editing your mode's JSON config file - just back up first and use a simple text editor like TextEdit or VS Code.
Open Finder and navigate to \~/Documents/SuperWhisper/modes/ to access your modes folder
Use Quick Look (press Space) on JSON files to preview and identify your mode by its "name" field
Open the JSON file and change "context\_from\_selection" from `false` to `true`
Save your changes and restart Superwhisper to activate the selection context feature
*Awesome! You can now reference `` in your custom instructions, as covered in [Prompting Tips](#prompting-tips).*
***
Unlike other modes, Custom Mode isn't limited to text formatting. **Combine context-awareness with your instructions to create powerful, specialized workflows tailored to your needs.**
# Customizing Built-In Modes
Source: https://superwhisper.com/docs/modes/customizing-modes
Want to tweak a built-in mode? Learn how to create customized versions of your favorite modes by accessing their AI instructions and adding your own adjustments—perfect for when you need something between built-in and fully custom.
This guide covers a more advanced workflow that requires basic understanding of AI prompting and Superwhisper's features. If you're new to Superwhisper, start with the built-in modes first.
## Overview
Built-in modes are regularly updated based on user feedback to cover common use cases. **To customize a built-in mode, you will essentially need to copy its AI instructions to create a new [Custom Mode](custom) with this.** While your customized version won't receive AI instruction updates when enhancements are published for the original mode, it's still a great way to create something tailored to your needs without starting from scratch.
## Step-by-Step
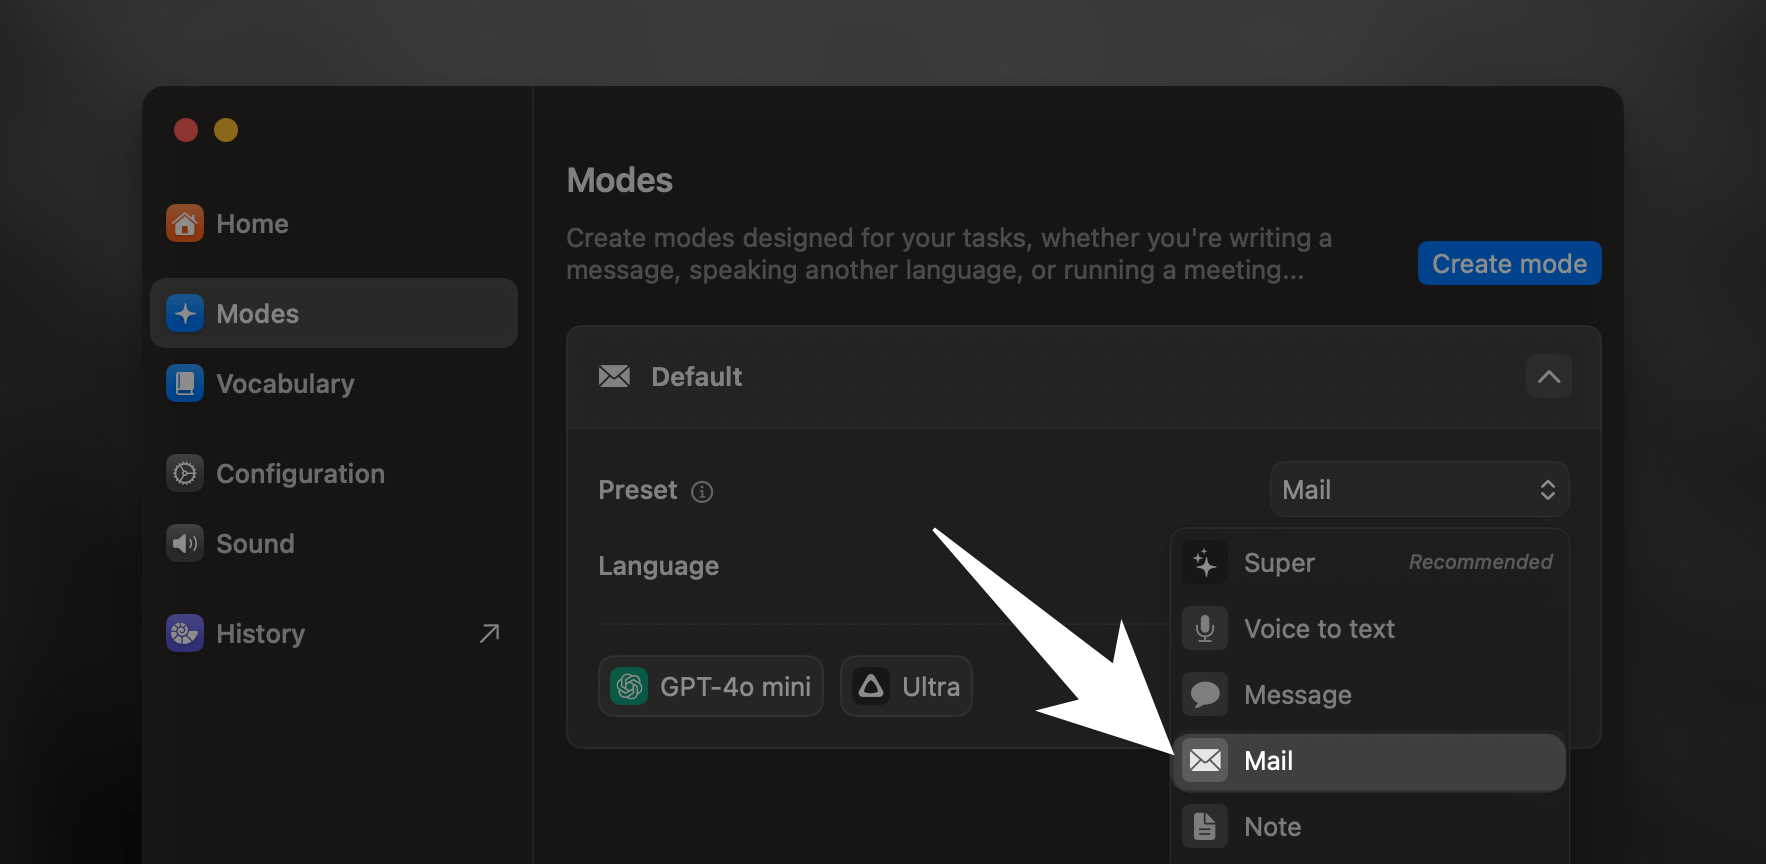
1. Create a new mode using the built-in mode you want to customize
2. Make a quick test recording (a simple "This is a test" works fine)
3. Let it process through AI
1. Open the History tab
2. Find your test recording
3. Look for the prompt box in the bottom right sidebar
4. Select and copy all text
5. Paste into a text editor for better visibility
**Each example consists of two parts:**
* Input field: Shows how you'll phrase your requests
* Output field: Demonstrates your expected AI response
**How to set:**
* Click "Add Example" to create your first example pair
* Fill in both the input and output fields
* Add more examples by clicking "Add Example" again
* Right-click any example to duplicate or delete it
Adding 2-3 examples significantly improves AI's understanding of your needs and leads to more accurate responses.
***
## Advanced Tip
Currently, Custom Mode doesn't include text selection context like [Super Mode](super). Enable this by editing your mode's JSON config file - just back up first and use a simple text editor like TextEdit or VS Code.
Open Finder and navigate to \~/Documents/SuperWhisper/modes/ to access your modes folder
Use Quick Look (press Space) on JSON files to preview and identify your mode by its "name" field
Open the JSON file and change "context\_from\_selection" from `false` to `true`
Save your changes and restart Superwhisper to activate the selection context feature
*Awesome! You can now reference `` in your custom instructions, as covered in [Prompting Tips](#prompting-tips).*
***
Unlike other modes, Custom Mode isn't limited to text formatting. **Combine context-awareness with your instructions to create powerful, specialized workflows tailored to your needs.**
# Customizing Built-In Modes
Source: https://superwhisper.com/docs/modes/customizing-modes
Want to tweak a built-in mode? Learn how to create customized versions of your favorite modes by accessing their AI instructions and adding your own adjustments—perfect for when you need something between built-in and fully custom.
This guide covers a more advanced workflow that requires basic understanding of AI prompting and Superwhisper's features. If you're new to Superwhisper, start with the built-in modes first.
## Overview
Built-in modes are regularly updated based on user feedback to cover common use cases. **To customize a built-in mode, you will essentially need to copy its AI instructions to create a new [Custom Mode](custom) with this.** While your customized version won't receive AI instruction updates when enhancements are published for the original mode, it's still a great way to create something tailored to your needs without starting from scratch.
## Step-by-Step
1. Create a new mode using the built-in mode you want to customize
2. Make a quick test recording (a simple "This is a test" works fine)
3. Let it process through AI
1. Open the History tab
2. Find your test recording
3. Look for the prompt box in the bottom right sidebar
4. Select and copy all text
5. Paste into a text editor for better visibility
 1. Find the `` XML tags
2. Copy only the content between these tags
3. If present, note any `` sections
1. Create a new Custom Mode
2. Click "Change Prompt"
3. Paste the copied instructions
4. Add any examples from the original mode
5. Make your desired adjustments
Not sure what to customize? From context awareness to capturing system audio, check out [Custom Mode](custom) to explore all the powerful features you can add to your workflow.
# Email
Source: https://superwhisper.com/docs/modes/email
Transform your spoken words into properly formatted emails instantly - just speak naturally and let Email Mode handle the structure.
1. Find the `` XML tags
2. Copy only the content between these tags
3. If present, note any `` sections
1. Create a new Custom Mode
2. Click "Change Prompt"
3. Paste the copied instructions
4. Add any examples from the original mode
5. Make your desired adjustments
Not sure what to customize? From context awareness to capturing system audio, check out [Custom Mode](custom) to explore all the powerful features you can add to your workflow.
# Email
Source: https://superwhisper.com/docs/modes/email
Transform your spoken words into properly formatted emails instantly - just speak naturally and let Email Mode handle the structure.
 ## Key Features
**This mode makes email dictation effortless by:**
* Adding smart greetings and closings
* Keeping your natural tone and style
* Highlighting key action items
* Fixing grammar and punctuation
***
Email Mode takes your natural speech and adds proper email structure while keeping your authentic voice.
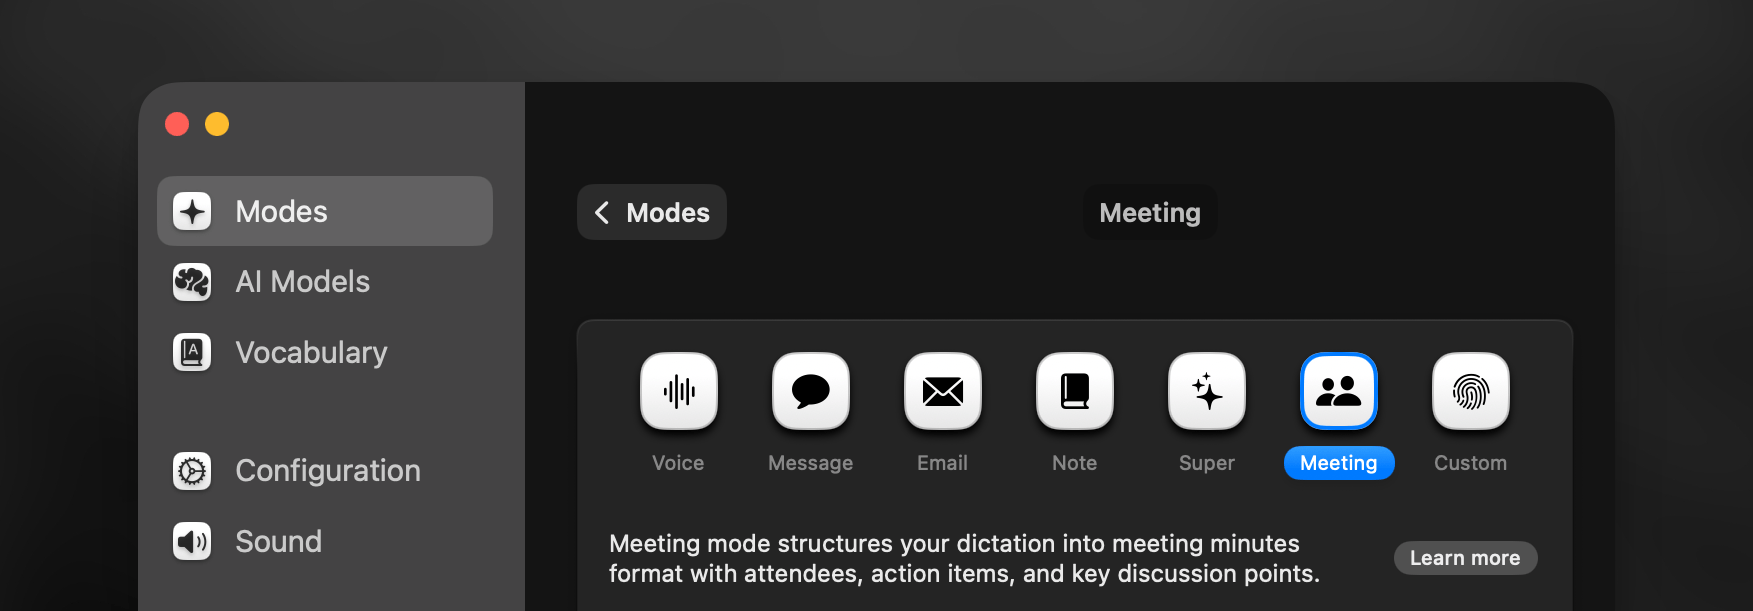
# Meeting
Source: https://superwhisper.com/docs/modes/meeting
Meeting mode records audio from your meetings and transcribes it into a clear summary, helping you capture key points without the noise.
## Key Features
**This mode makes email dictation effortless by:**
* Adding smart greetings and closings
* Keeping your natural tone and style
* Highlighting key action items
* Fixing grammar and punctuation
***
Email Mode takes your natural speech and adds proper email structure while keeping your authentic voice.
# Meeting
Source: https://superwhisper.com/docs/modes/meeting
Meeting mode records audio from your meetings and transcribes it into a clear summary, helping you capture key points without the noise.
 ## Key Features
**Meeting Mode streamlines your meetings by:**
* Converting spoken discussions into concise summaries
* Preserves important context while removing redundant content
## Key Features
**Meeting Mode streamlines your meetings by:**
* Converting spoken discussions into concise summaries
* Preserves important context while removing redundant content
Perfect for team meetings, client calls, and any conversation you need to review later.
***
## Advanced Tip
Want to separate different speakers in your meeting transcripts? Explore how Custom Mode can be used to handle speaker recognition for advanced AI processing. With Superwhisper it is possible to track who said what.
# Message
Source: https://superwhisper.com/docs/modes/message
Message Mode enhances your dictation with smart formatting and grammar fixes, delivering polished, ready-to-send messages that capture your voice while maintaining clarity.
 ## Key Features
**Message Mode takes your dictation beyond basic transcription by:**
* Removing speech artifacts and filler words
* Fixing grammar and punctuation
* Formatting text for readability
* Maintaining natural conversation flow
***
Unlike the basic transcription in Voice Mode, Message Mode applies AI processing to your dictation. **It intelligently refines your speech while preserving your voice and communication style.**
# Intro to Modes
Source: https://superwhisper.com/docs/modes/modes
Superwhisper modes tailor how your voice gets processed, helping you work faster and smarter. Choose the right mode to transform your dictation into exactly what you need.
## Key Features
**Message Mode takes your dictation beyond basic transcription by:**
* Removing speech artifacts and filler words
* Fixing grammar and punctuation
* Formatting text for readability
* Maintaining natural conversation flow
***
Unlike the basic transcription in Voice Mode, Message Mode applies AI processing to your dictation. **It intelligently refines your speech while preserving your voice and communication style.**
# Intro to Modes
Source: https://superwhisper.com/docs/modes/modes
Superwhisper modes tailor how your voice gets processed, helping you work faster and smarter. Choose the right mode to transform your dictation into exactly what you need.
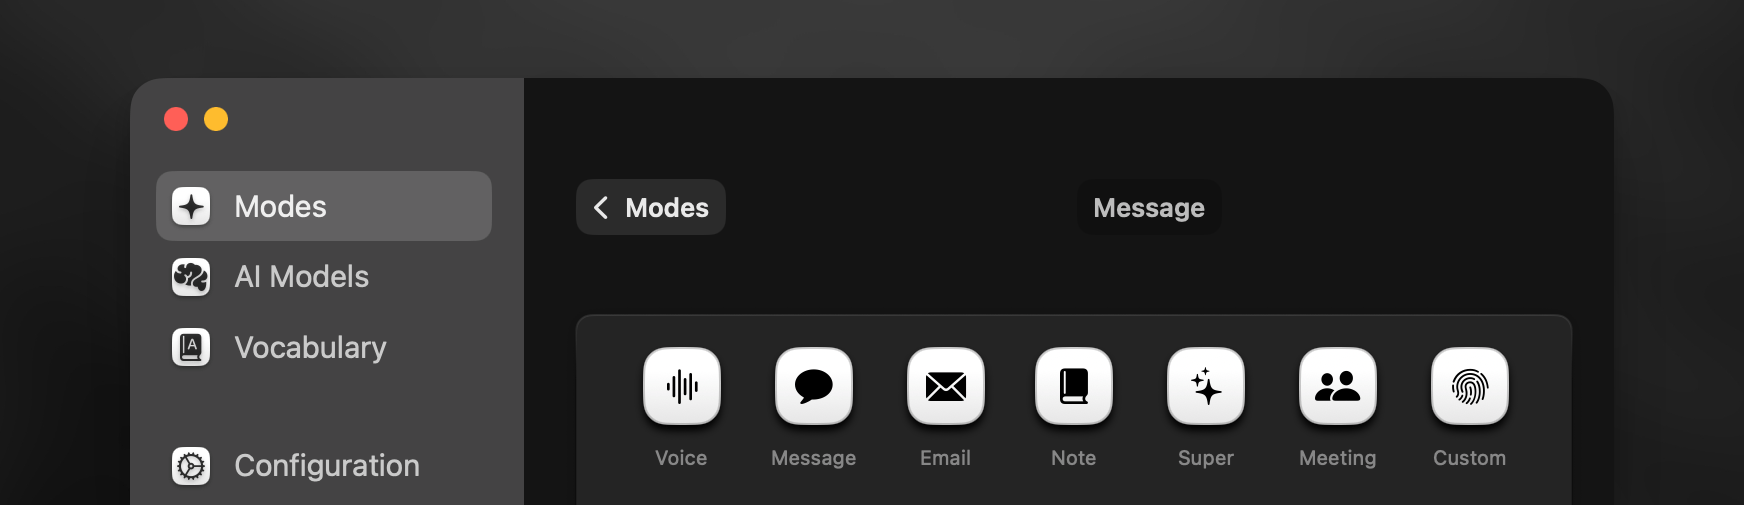 For greater workflow flexibility, create different versions of each mode by customizing voice models, AI models, and other settings. **Click any mode's name to rename it.**
## Per-Mode Settings
### Voice Processing
After dictating, your audio first goes through voice processing for transcription.
For greater workflow flexibility, create different versions of each mode by customizing voice models, AI models, and other settings. **Click any mode's name to rename it.**
## Per-Mode Settings
### Voice Processing
After dictating, your audio first goes through voice processing for transcription.
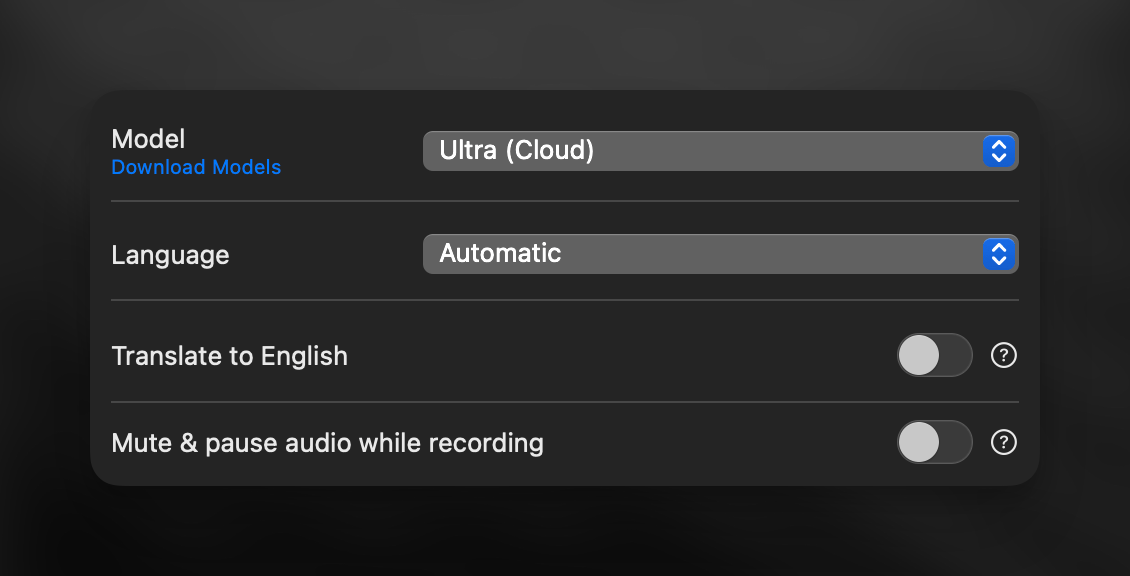 Manage all your models in the AI Models tab where you can:
* Use cloud-based models
* Download voice models for local use
* Connect your own API tokens for supported services
* Supported languages vary by voice model
* Based on your chosen language and voice model, you may see an option to translate your dictation to English. For best results, use Pro, Standard, or Ultra models
Your preferred voice model does not support translation to English, or you need translation to another language? Set this up with AI processing by creating a [Custom mode](custom)
Mute & pause recording automatically when dictating with the current mode
* Real-time transcription is available when using the Nova (Cloud) model
* Toggle this option to see your words appear in the recording window instantly as you speak
***
### AI Processing
After transcription, AI processing shapes your text based on the mode's purpose.
Manage all your models in the AI Models tab where you can:
* Use cloud-based models
* Download voice models for local use
* Connect your own API tokens for supported services
* Supported languages vary by voice model
* Based on your chosen language and voice model, you may see an option to translate your dictation to English. For best results, use Pro, Standard, or Ultra models
Your preferred voice model does not support translation to English, or you need translation to another language? Set this up with AI processing by creating a [Custom mode](custom)
Mute & pause recording automatically when dictating with the current mode
* Real-time transcription is available when using the Nova (Cloud) model
* Toggle this option to see your words appear in the recording window instantly as you speak
***
### AI Processing
After transcription, AI processing shapes your text based on the mode's purpose.
 * Access and manage AI models through the dedicated tab
* Built-in modes AI processing support multiple languages automatically
* Make sure to select your correct language in the [Voice Processing](#voice-processing) settings
* AI will process your dictation and respond in your chosen language
* AI processing varies by mode
* [Voice Mode](voice) does not include AI processing
* [Message](message), [Email](email), [Note](note), [Super](super), and [Meeting](meeting) modes use optimized AI processing instructions to deliver the best results for their specific purposes
* [Custom Mode](custom) lets you take full control by writing your own AI processing instructions
* Both [Super](super) and [Custom](custom) modes enhance AI processing capabilities with context awareness, providing additional possibilities
***
### Auto-Activation Rules
Set up rules to automatically switch modes based on your active apps and websites.
* Access and manage AI models through the dedicated tab
* Built-in modes AI processing support multiple languages automatically
* Make sure to select your correct language in the [Voice Processing](#voice-processing) settings
* AI will process your dictation and respond in your chosen language
* AI processing varies by mode
* [Voice Mode](voice) does not include AI processing
* [Message](message), [Email](email), [Note](note), [Super](super), and [Meeting](meeting) modes use optimized AI processing instructions to deliver the best results for their specific purposes
* [Custom Mode](custom) lets you take full control by writing your own AI processing instructions
* Both [Super](super) and [Custom](custom) modes enhance AI processing capabilities with context awareness, providing additional possibilities
***
### Auto-Activation Rules
Set up rules to automatically switch modes based on your active apps and websites.
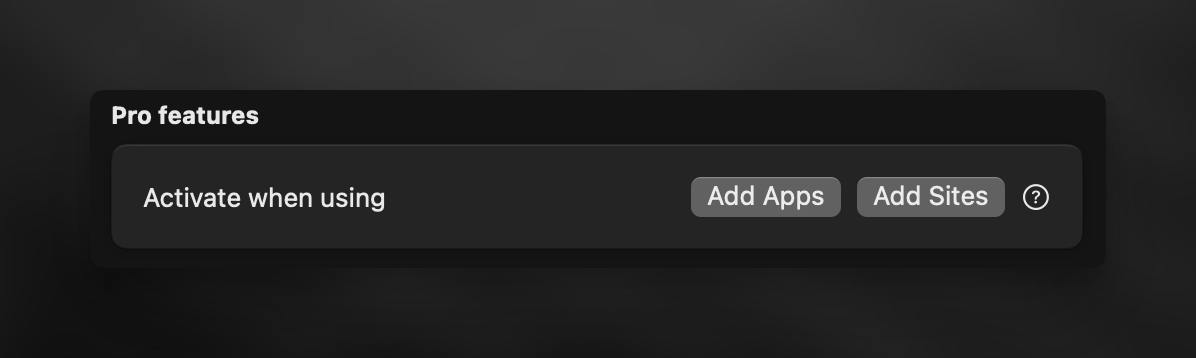 Keep in mind: Once a mode activates for an app or site, you won't be able to override it, and the system doesn't automatically switch back to your previous mode.
***
## Learn More
Jump between modes easily with: **Keyboard Shortcuts, Auto-Activation Rules, & Deep Links.**
Want to tweak a built-in mode beyond its basic settings? **Create a Custom Mode to get the exact functionality you need.**
# Note
Source: https://superwhisper.com/docs/modes/note
Turn your spoken ideas into structured, easy-to-read notes. Notes Mode helps you capture and organize your thoughts with smart formatting and clear hierarchies.
Keep in mind: Once a mode activates for an app or site, you won't be able to override it, and the system doesn't automatically switch back to your previous mode.
***
## Learn More
Jump between modes easily with: **Keyboard Shortcuts, Auto-Activation Rules, & Deep Links.**
Want to tweak a built-in mode beyond its basic settings? **Create a Custom Mode to get the exact functionality you need.**
# Note
Source: https://superwhisper.com/docs/modes/note
Turn your spoken ideas into structured, easy-to-read notes. Notes Mode helps you capture and organize your thoughts with smart formatting and clear hierarchies.
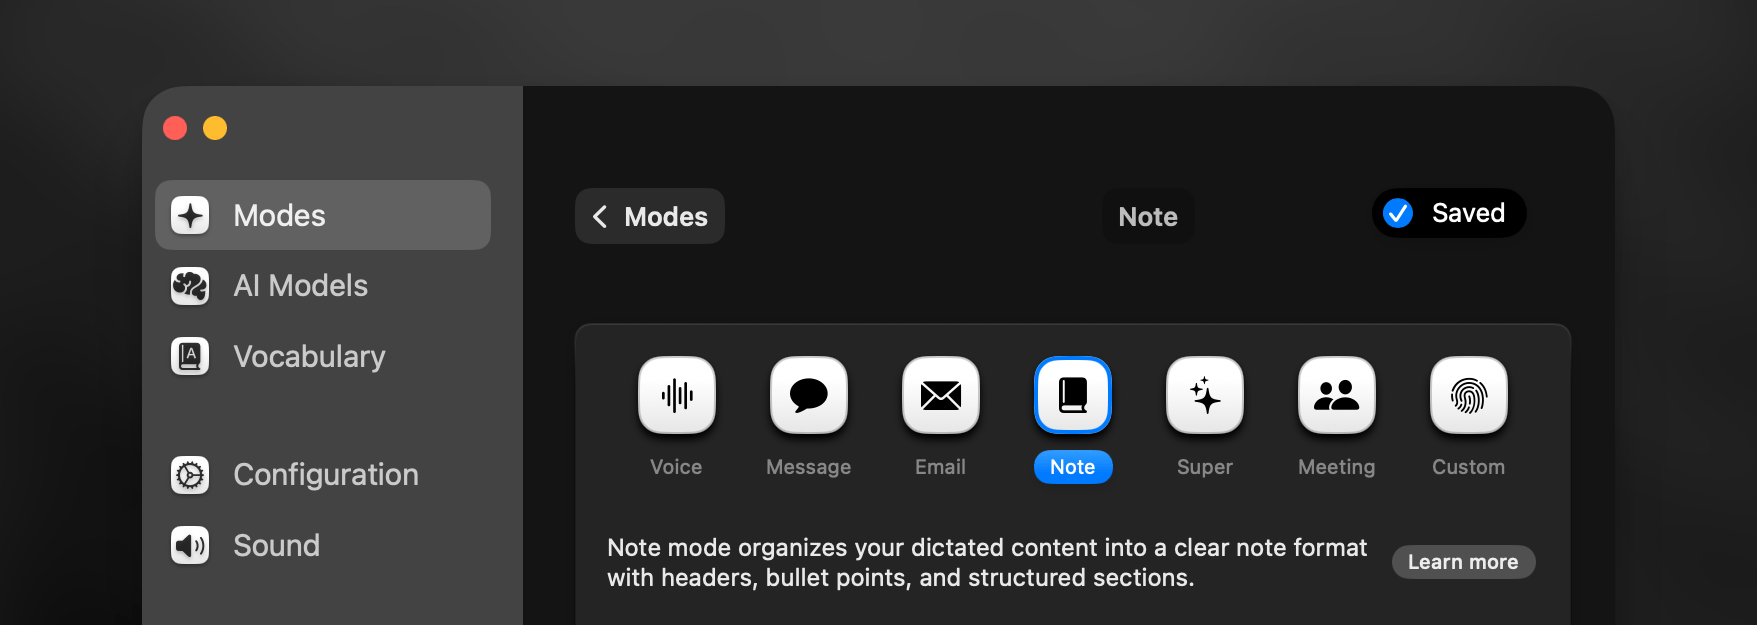 ## Key Features
**Notes Mode transforms your spoken words by:**
* Improving clarity
* Formatting text for optimal readability
* Highlighting key points and action items
* Adapting content structure based on topic and key topics
* Creating lists or bullet points from your dictation
***
Note Mode is perfect for lectures, meetings, brainstorming sessions, and quick thought capture.
# Speaker-Separated Meetings
Source: https://superwhisper.com/docs/modes/speaker-separated-meetings
Learn how to transcribe meetings with speaker separation and process them with AI for enhanced insights. This method combines Superwhisper's speaker identification capabilities with powerful AI processing.
This is an advanced workflow requiring configuration file edits and multiple steps. If you need basic meeting summaries, consider using the standard Meeting Mode. Or, if you want speaker-separated transcripts with basic AI processing, simply enable speaker separation in a Custom Mode with Nova (Cloud) for voice.
## Overview
This guide shows you how to combine speaker-separated transcription with AI analysis to understand each participant's contributions in your meetings. You'll learn how to capture detailed transcripts that track who said what, then use AI to extract meaningful insights from individual speakers' input.
## Transcription Setup and Recording
Create a new Custom Mode with these settings:
* Enable "Identify Speakers" toggle
* Enable "Record from System Audio" if recording live meetings
* Select your preferred voice model
While all voice models support speaker separation, Nova (Cloud) delivers the most accurate and reliable results for this feature.
Disable AI processing initially to speed up transcription. This approach is suggested since Superwhisper currently can't process speaker-separated transcripts with AI in the same mode. Remember to back up your mode's config file before making changes:
* Navigate to: \~/Documents/superwhisper/modes/
* Open your mode's JSON file in your preferred text editor
* Change "languageModelEnabled" from `true` to `false`
* Save and restart Superwhisper for changes to take effect
Choose your preferred recording method:
* Select your speaker separation mode
* Start recording
Be aware that pressing Escape will stop recording
* Record meeting with your preferred app
* Click the Superwhisper menu bar icon
* Select your speaker separation mode
* Select "Transcribe File"
* Choose your audio file
## Key Features
**Notes Mode transforms your spoken words by:**
* Improving clarity
* Formatting text for optimal readability
* Highlighting key points and action items
* Adapting content structure based on topic and key topics
* Creating lists or bullet points from your dictation
***
Note Mode is perfect for lectures, meetings, brainstorming sessions, and quick thought capture.
# Speaker-Separated Meetings
Source: https://superwhisper.com/docs/modes/speaker-separated-meetings
Learn how to transcribe meetings with speaker separation and process them with AI for enhanced insights. This method combines Superwhisper's speaker identification capabilities with powerful AI processing.
This is an advanced workflow requiring configuration file edits and multiple steps. If you need basic meeting summaries, consider using the standard Meeting Mode. Or, if you want speaker-separated transcripts with basic AI processing, simply enable speaker separation in a Custom Mode with Nova (Cloud) for voice.
## Overview
This guide shows you how to combine speaker-separated transcription with AI analysis to understand each participant's contributions in your meetings. You'll learn how to capture detailed transcripts that track who said what, then use AI to extract meaningful insights from individual speakers' input.
## Transcription Setup and Recording
Create a new Custom Mode with these settings:
* Enable "Identify Speakers" toggle
* Enable "Record from System Audio" if recording live meetings
* Select your preferred voice model
While all voice models support speaker separation, Nova (Cloud) delivers the most accurate and reliable results for this feature.
Disable AI processing initially to speed up transcription. This approach is suggested since Superwhisper currently can't process speaker-separated transcripts with AI in the same mode. Remember to back up your mode's config file before making changes:
* Navigate to: \~/Documents/superwhisper/modes/
* Open your mode's JSON file in your preferred text editor
* Change "languageModelEnabled" from `true` to `false`
* Save and restart Superwhisper for changes to take effect
Choose your preferred recording method:
* Select your speaker separation mode
* Start recording
Be aware that pressing Escape will stop recording
* Record meeting with your preferred app
* Click the Superwhisper menu bar icon
* Select your speaker separation mode
* Select "Transcribe File"
* Choose your audio file
 1. Open Superwhisper History
2. Select the Segments tab
3. Rename speakers (optional):
* Click speaker names directly, or
* Use the right sidebar's Speakers section
4. Click "Copy to Clipboard" to get the full speaker-separated transcript
***
## AI Processing and Analysis
### Option A: External AI Services
* Use OpenAI, Claude, or your preferred AI provider
* Request your desired analysis on the transcript
### Option B: Superwhisper Custom Mode
* Write an assistant-focused prompt
* Enable Application Context
For tips and ideas on how to get the best results with your custom instructions, check these [prompting tips](custom#prompting-tips).
* Open any text editor
* Paste your speaker-separated transcript
* Activate the mode you have just created
* Dictate your analysis request
### Sample Procesing Requests
```
"Summarize this meeting's key points by speaker"
"Extract action items and assign them to each speaker"
"Show which team members contributed to each key decision"
"Create a participation report showing who discussed which topics in this meeting"
"Break down topic ownership and insights by participant from this meeting's transcript"
```
# Super
Source: https://superwhisper.com/docs/modes/super
Supercharge your dictation with advanced context-aware processing. Super Mode intelligently adapts to your active applications, selected text, and clipboard content to deliver more accurate and relevant results.
1. Open Superwhisper History
2. Select the Segments tab
3. Rename speakers (optional):
* Click speaker names directly, or
* Use the right sidebar's Speakers section
4. Click "Copy to Clipboard" to get the full speaker-separated transcript
***
## AI Processing and Analysis
### Option A: External AI Services
* Use OpenAI, Claude, or your preferred AI provider
* Request your desired analysis on the transcript
### Option B: Superwhisper Custom Mode
* Write an assistant-focused prompt
* Enable Application Context
For tips and ideas on how to get the best results with your custom instructions, check these [prompting tips](custom#prompting-tips).
* Open any text editor
* Paste your speaker-separated transcript
* Activate the mode you have just created
* Dictate your analysis request
### Sample Procesing Requests
```
"Summarize this meeting's key points by speaker"
"Extract action items and assign them to each speaker"
"Show which team members contributed to each key decision"
"Create a participation report showing who discussed which topics in this meeting"
"Break down topic ownership and insights by participant from this meeting's transcript"
```
# Super
Source: https://superwhisper.com/docs/modes/super
Supercharge your dictation with advanced context-aware processing. Super Mode intelligently adapts to your active applications, selected text, and clipboard content to deliver more accurate and relevant results.
 ## Key Features
**Super Mode enhances your dictation by:**
* Adapting messages to match application context
* Correcting spelling based on app-specific terms, names, and vocabulary
* Converting spoken URLs and emails into proper format
* Preserving message tone and intent while improving clarity
***
## Context Awareness
**Super Mode uses accessibility APIs to gather three types of context:**
* Identifies your active application
* Reads text from current input fields or text editor
* Reads any text you've highlighted
* Uses selection to inform AI processing
* Incorporates text copied within 3 seconds of dictation, or during dictation
***
## Commands
**Super Mode lets you dictate commands on selected text.** While it understands context, for best result use commands focused on text transformation or formatting rather than content analysis or generation.
"Make this text title case"
"Convert selection to uppercase"
"Format my selected text as bullet points"
"Summarize this paragraph"
"Expand on these ideas"
"Rewrite this section"
**While you can use commands for formatting, they're completely optional.** Just dictate naturally and Super Mode will intelligently adapt to your active app - no text selection or copying needed. It's that simple.
***
## Troubleshooting
If you're not getting expected results with Super Mode, check these common issues:
* If you are dictating a command, ensure it is related to formatting or text transformation only
* Review the Commands section above for examples
For optimal results, use one of the following suggested AI models:
* Claude 3.5 Sonnet
* GPT-4o Mini
* GPT-4o
* Claude 3.5 Haiku
* Check system settings for the correct permissions
* For application context, make sure the correct app window is active
* For selected text context, verify that the text is selected when triggering the dictation
* Text copied to your clipboard will only be processed if done within 3 seconds of starting your dictation or while you're speaking
Check the History tab to see if context was properly sent to AI. You can view all AI-sent data in the bottom "prompt" field of the right sidebar. This can help you pinpoint if issues come from context capture, voice, or AI processing.
***
**Super Mode focuses on context-aware dictation and formatting.** If you need a different type of command with similar smart features, check out [Custom Mode](custom).
# Switching Modes
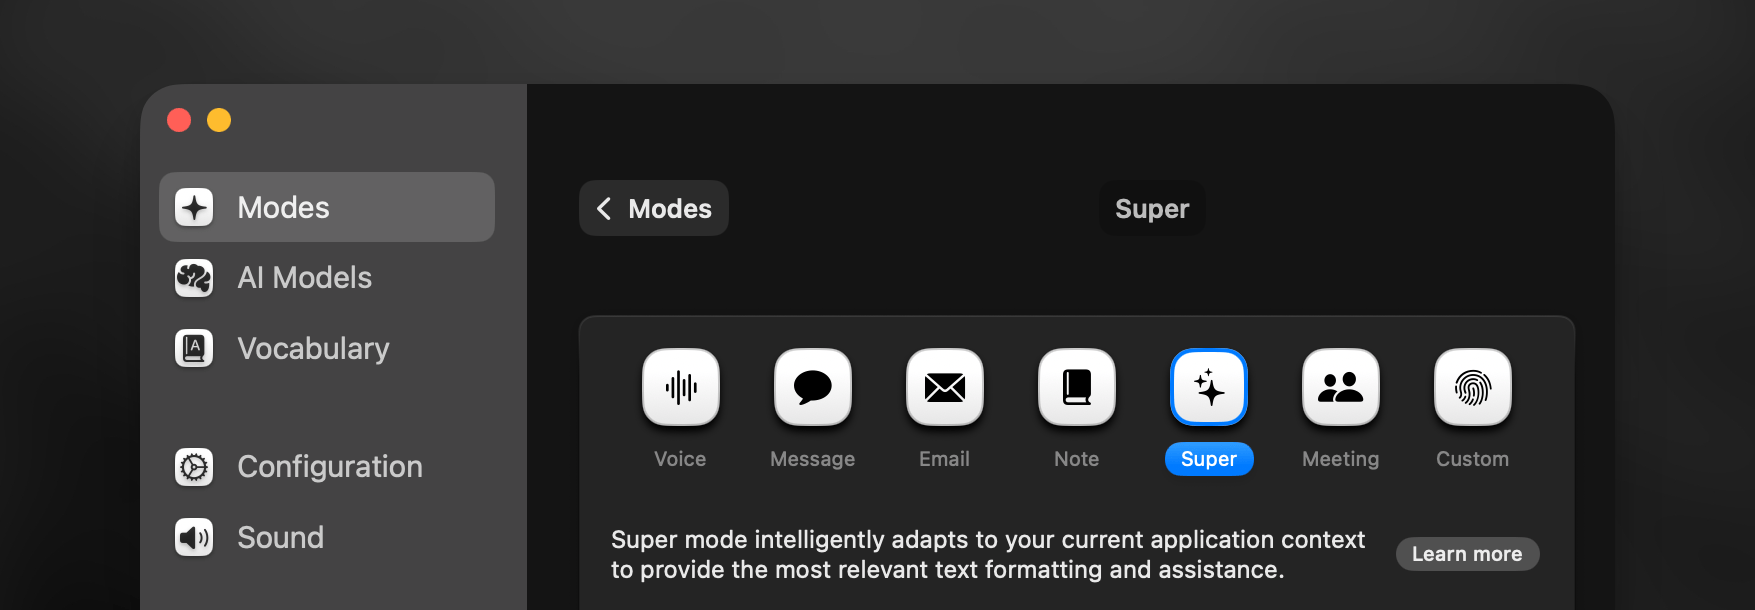
Source: https://superwhisper.com/docs/modes/switching-modes
Learn four convenient ways to switch between Superwhisper modes: keyboard shortcuts, menu bar, auto-activation rules, and deep links. Choose the method that best fits your workflow.
## Key Features
**Super Mode enhances your dictation by:**
* Adapting messages to match application context
* Correcting spelling based on app-specific terms, names, and vocabulary
* Converting spoken URLs and emails into proper format
* Preserving message tone and intent while improving clarity
***
## Context Awareness
**Super Mode uses accessibility APIs to gather three types of context:**
* Identifies your active application
* Reads text from current input fields or text editor
* Reads any text you've highlighted
* Uses selection to inform AI processing
* Incorporates text copied within 3 seconds of dictation, or during dictation
***
## Commands
**Super Mode lets you dictate commands on selected text.** While it understands context, for best result use commands focused on text transformation or formatting rather than content analysis or generation.
"Make this text title case"
"Convert selection to uppercase"
"Format my selected text as bullet points"
"Summarize this paragraph"
"Expand on these ideas"
"Rewrite this section"
**While you can use commands for formatting, they're completely optional.** Just dictate naturally and Super Mode will intelligently adapt to your active app - no text selection or copying needed. It's that simple.
***
## Troubleshooting
If you're not getting expected results with Super Mode, check these common issues:
* If you are dictating a command, ensure it is related to formatting or text transformation only
* Review the Commands section above for examples
For optimal results, use one of the following suggested AI models:
* Claude 3.5 Sonnet
* GPT-4o Mini
* GPT-4o
* Claude 3.5 Haiku
* Check system settings for the correct permissions
* For application context, make sure the correct app window is active
* For selected text context, verify that the text is selected when triggering the dictation
* Text copied to your clipboard will only be processed if done within 3 seconds of starting your dictation or while you're speaking
Check the History tab to see if context was properly sent to AI. You can view all AI-sent data in the bottom "prompt" field of the right sidebar. This can help you pinpoint if issues come from context capture, voice, or AI processing.
***
**Super Mode focuses on context-aware dictation and formatting.** If you need a different type of command with similar smart features, check out [Custom Mode](custom).
# Switching Modes
Source: https://superwhisper.com/docs/modes/switching-modes
Learn four convenient ways to switch between Superwhisper modes: keyboard shortcuts, menu bar, auto-activation rules, and deep links. Choose the method that best fits your workflow.
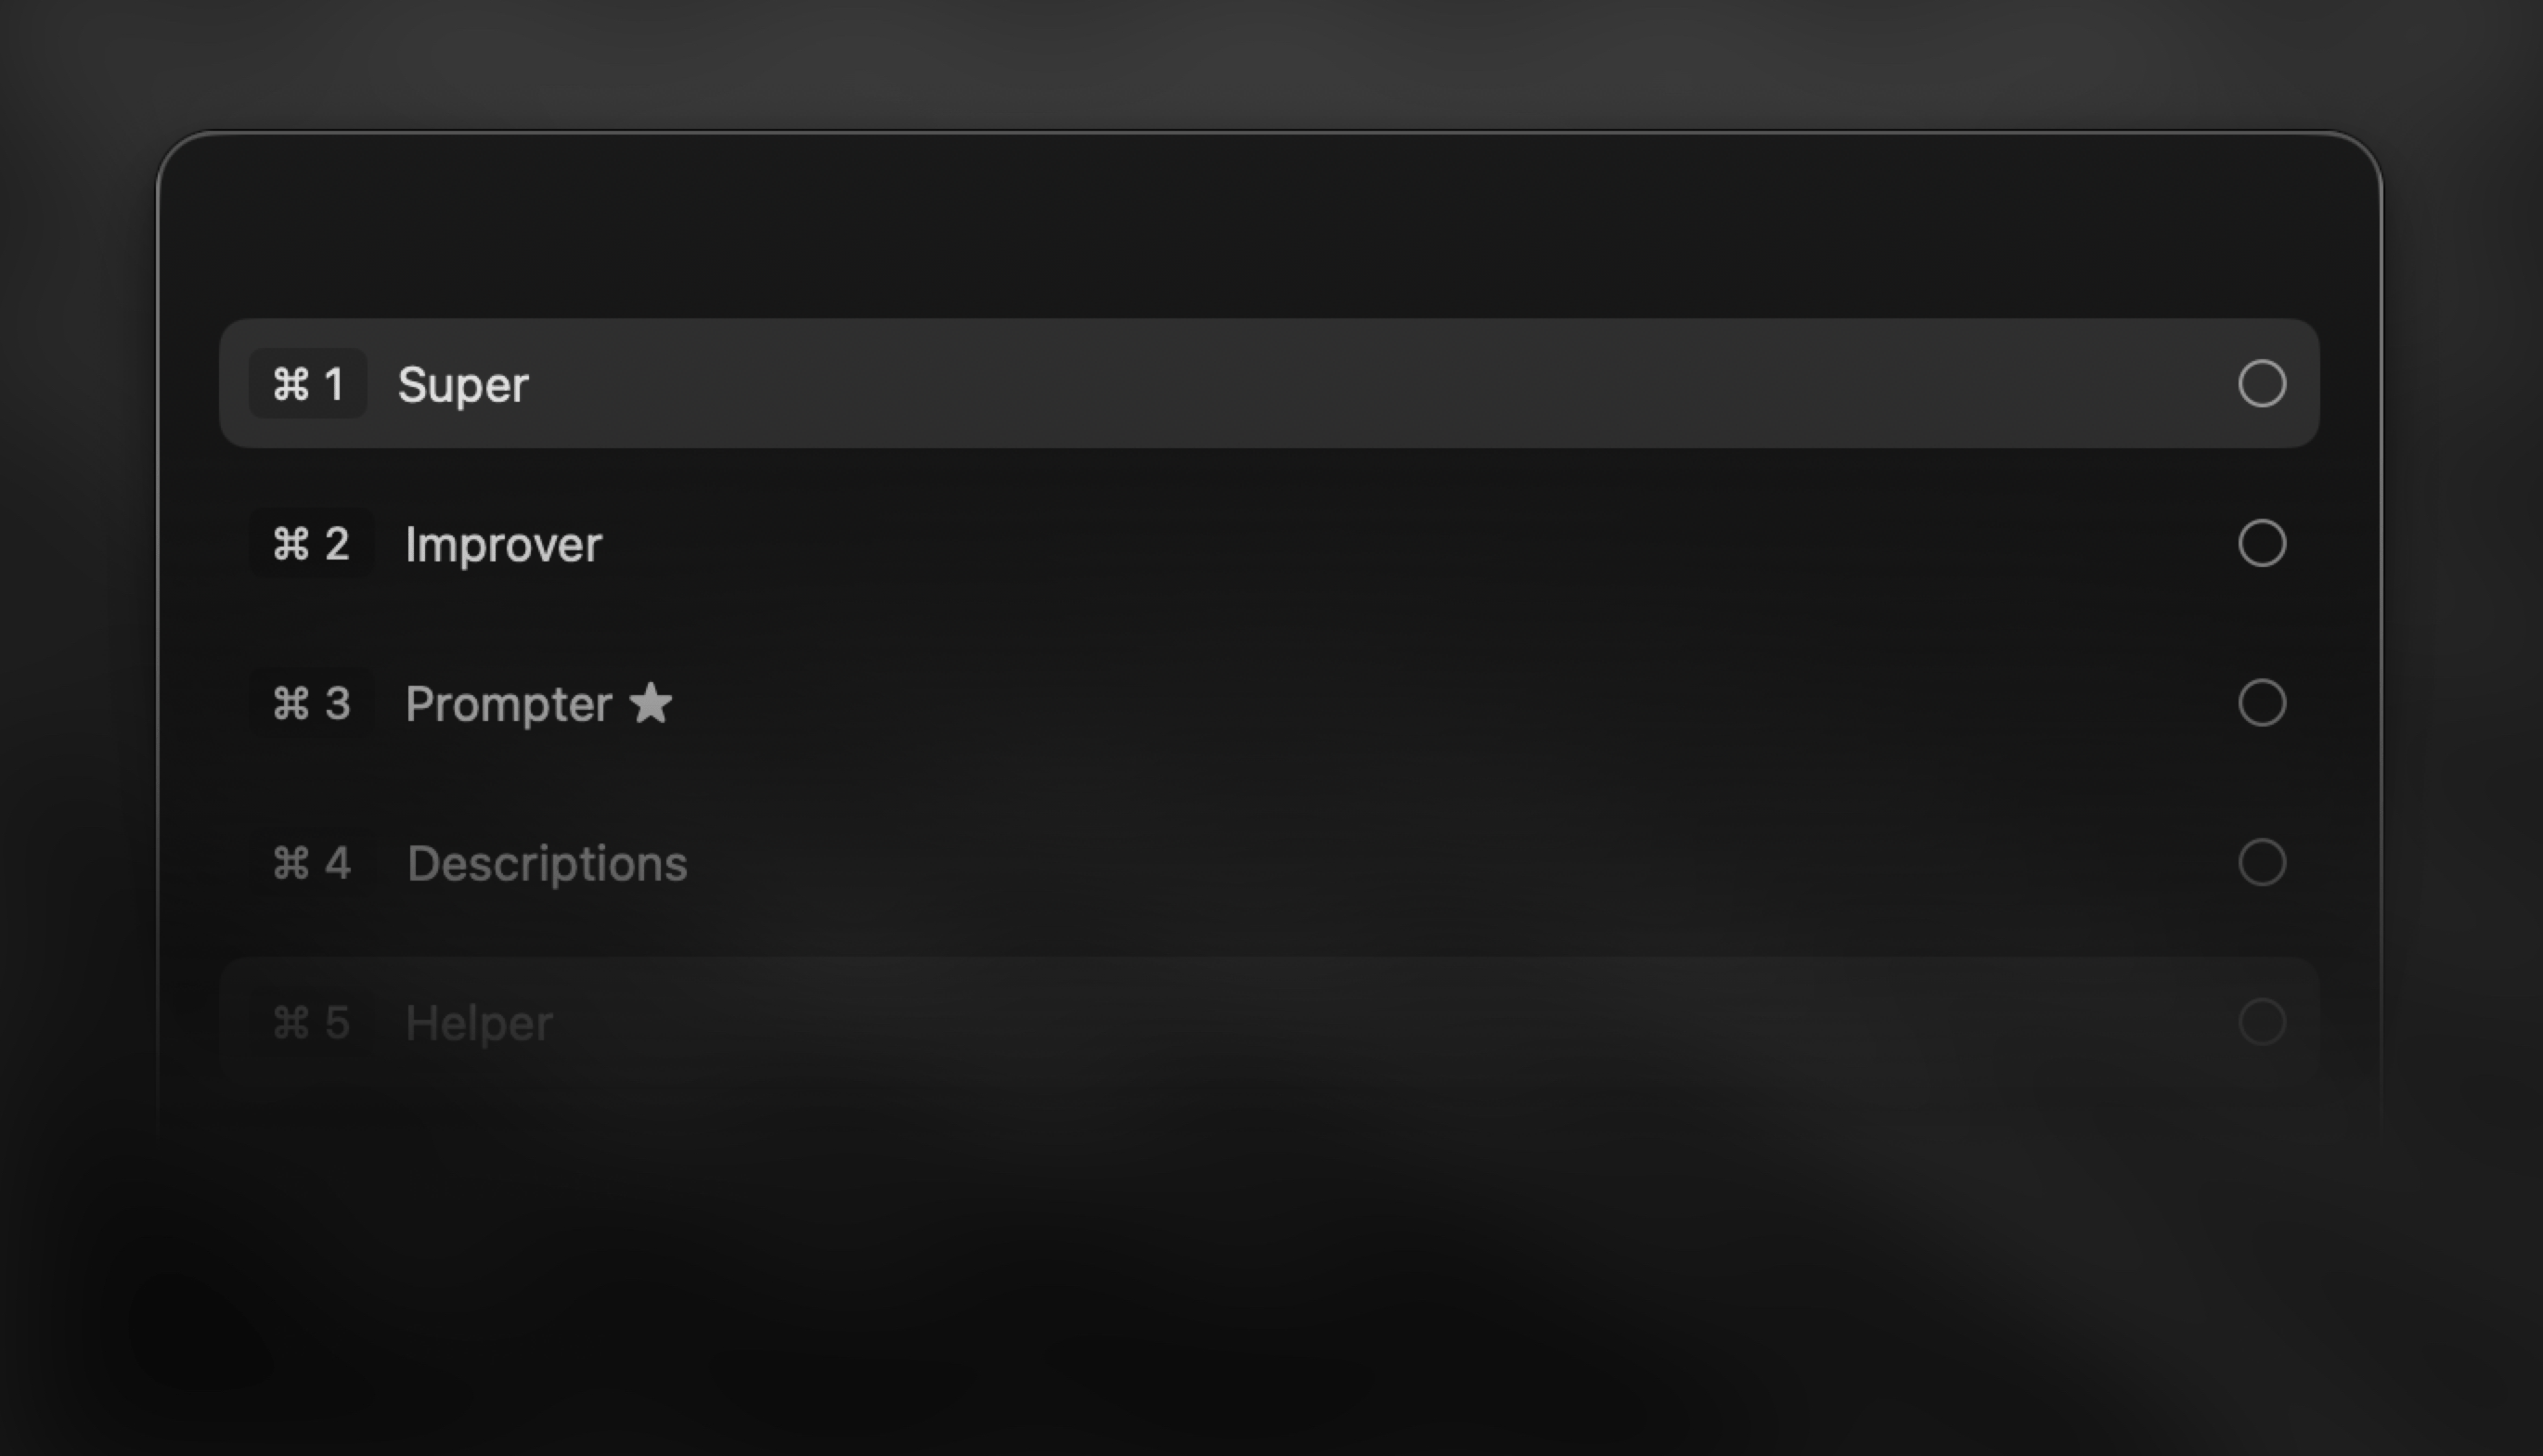 ## Overview
**Finding your preferred way to switch modes quickly is key to unlocking the full power of Superwhisper.** Whether you're writing emails, taking notes, or crafting messages, smooth mode switching helps you stay in flow while Superwhisper handles the heavy lifting of tailoring your voice input exactly how you need it.
***
## Keyboard Shortcut
A quick way to switch modes just before dictating, while on the recording window.
## Overview
**Finding your preferred way to switch modes quickly is key to unlocking the full power of Superwhisper.** Whether you're writing emails, taking notes, or crafting messages, smooth mode switching helps you stay in flow while Superwhisper handles the heavy lifting of tailoring your voice input exactly how you need it.
***
## Keyboard Shortcut
A quick way to switch modes just before dictating, while on the recording window.
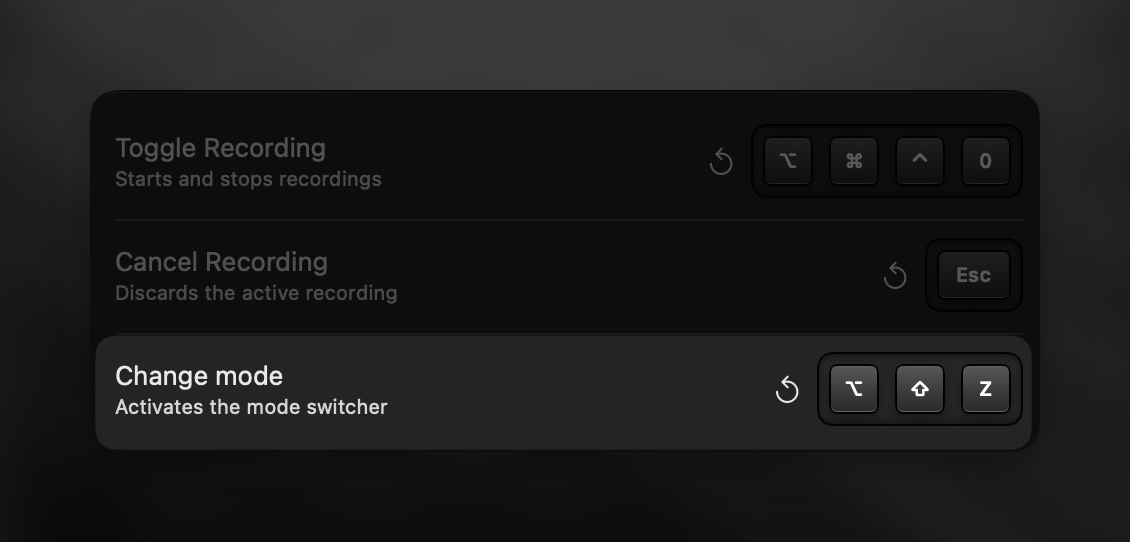 1. Trigger dictation to open the recording window
2. Press your configured "Change Mode" keyboard shortcut
3. Hold the modifier key(s) and tap the other key repeatedly to cycle through modes
4. Release when you reach your desired mode
The active mode is visible only in the large recording window view.
***
## Menu Bar
Change modes anytime with a quick menu bar click.
1. Trigger dictation to open the recording window
2. Press your configured "Change Mode" keyboard shortcut
3. Hold the modifier key(s) and tap the other key repeatedly to cycle through modes
4. Release when you reach your desired mode
The active mode is visible only in the large recording window view.
***
## Menu Bar
Change modes anytime with a quick menu bar click.
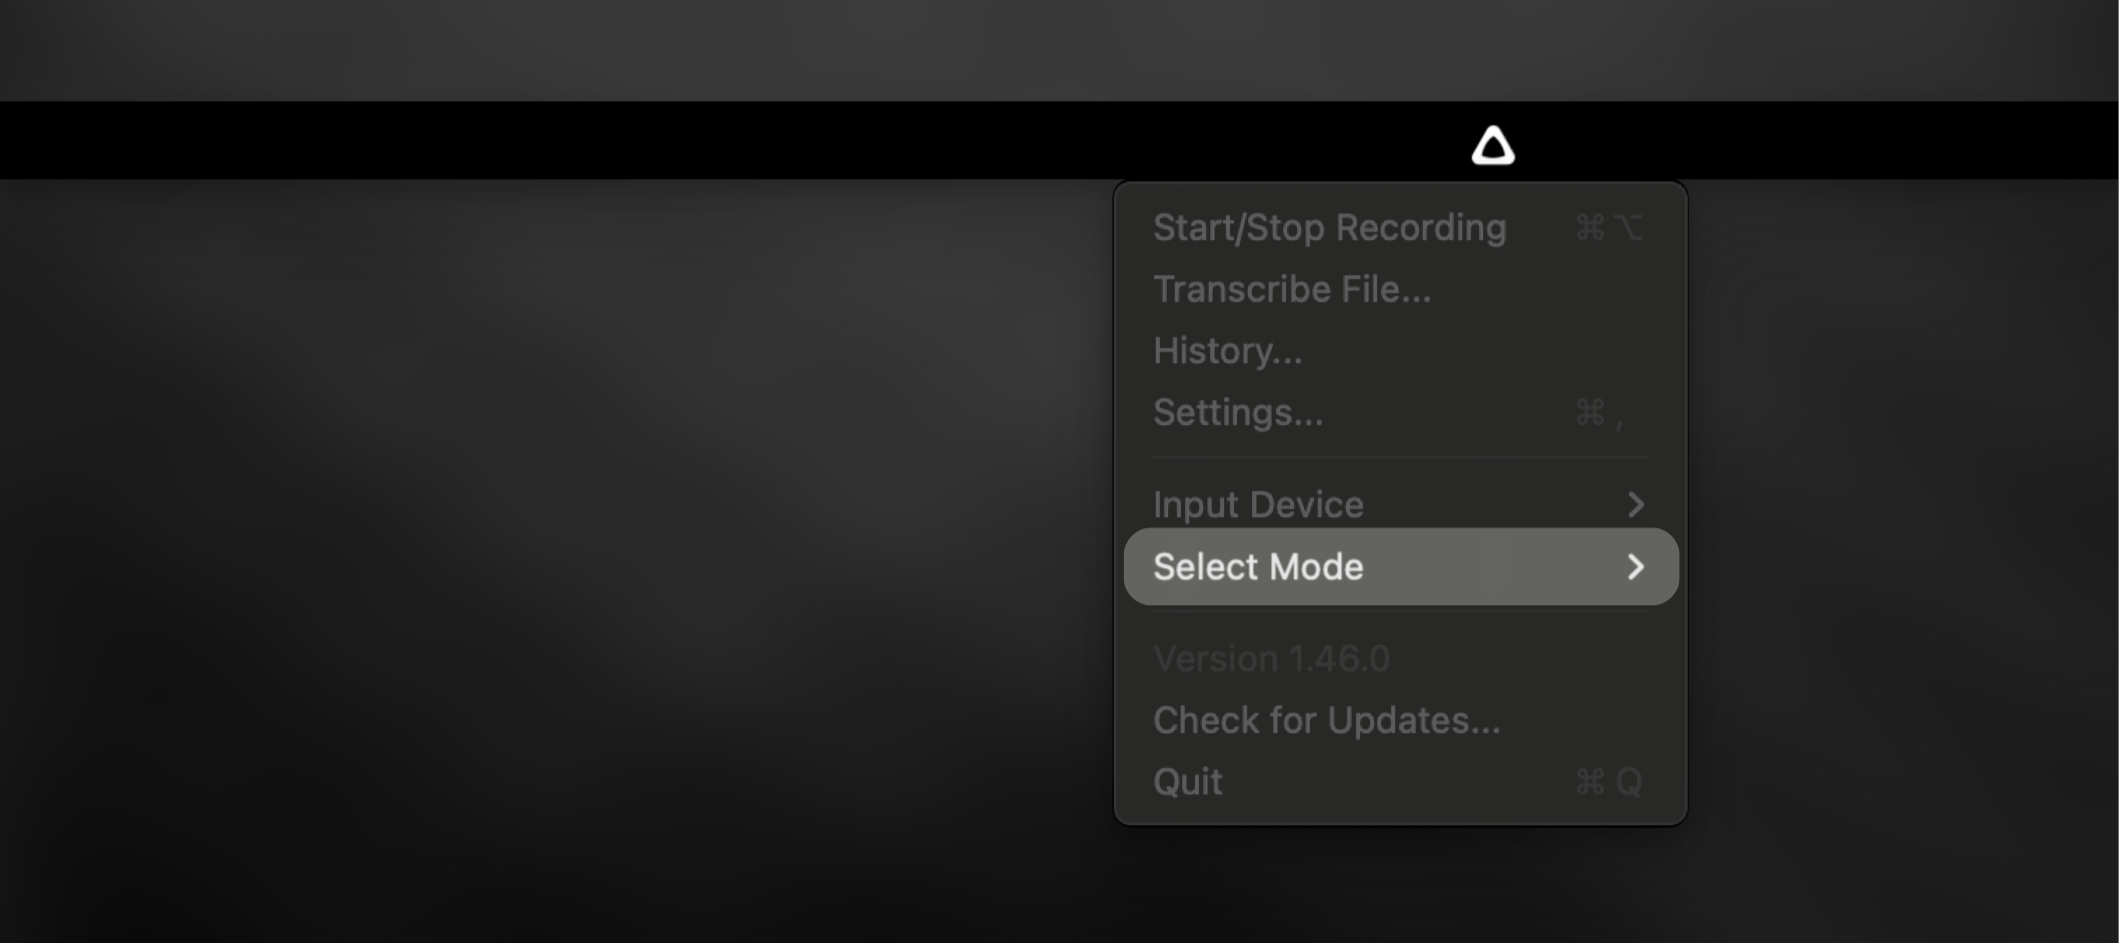 1. Click the Superwhisper menu bar icon
2. Select a new mode from the "Select Mode" submenu
***
## Auto-Activation Rules
Let Superwhisper switch modes automatically based on your active apps and websites. Set up rules in each mode's settings to match your workflow.
[Learn more about auto-activation →](modes#auto-activation-rules)
1. Click the Superwhisper menu bar icon
2. Select a new mode from the "Select Mode" submenu
***
## Auto-Activation Rules
Let Superwhisper switch modes automatically based on your active apps and websites. Set up rules in each mode's settings to match your workflow.
[Learn more about auto-activation →](modes#auto-activation-rules)
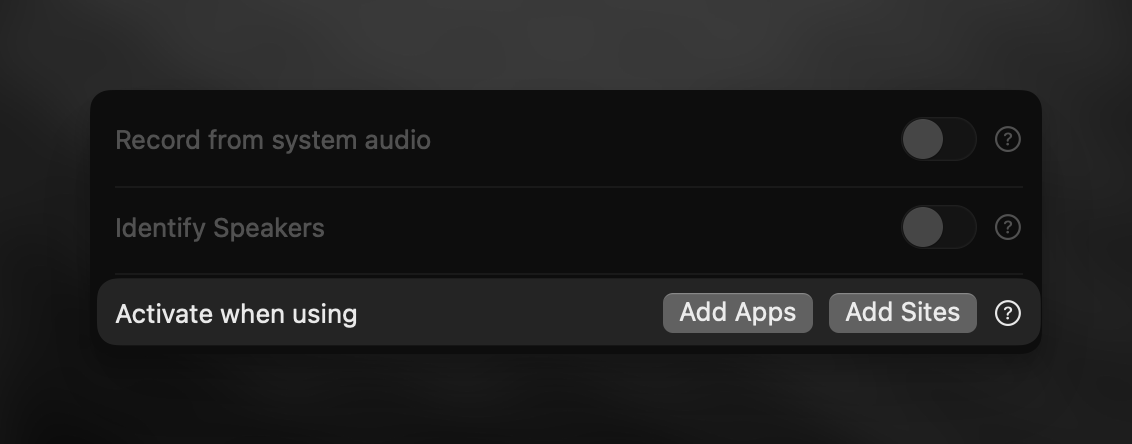 ***
## Deep Links
Deep links unlock powerful possibilities for mode switching—perfect for users familiar with automation tools who want to take their workflow to the next level.
**You can use the following deep links with Superwhisper:**
```
superwhisper://mode?key=YOUR_MODE_KEY
superwhisper://record
```
***
## Deep Links
Deep links unlock powerful possibilities for mode switching—perfect for users familiar with automation tools who want to take their workflow to the next level.
**You can use the following deep links with Superwhisper:**
```
superwhisper://mode?key=YOUR_MODE_KEY
superwhisper://record
```
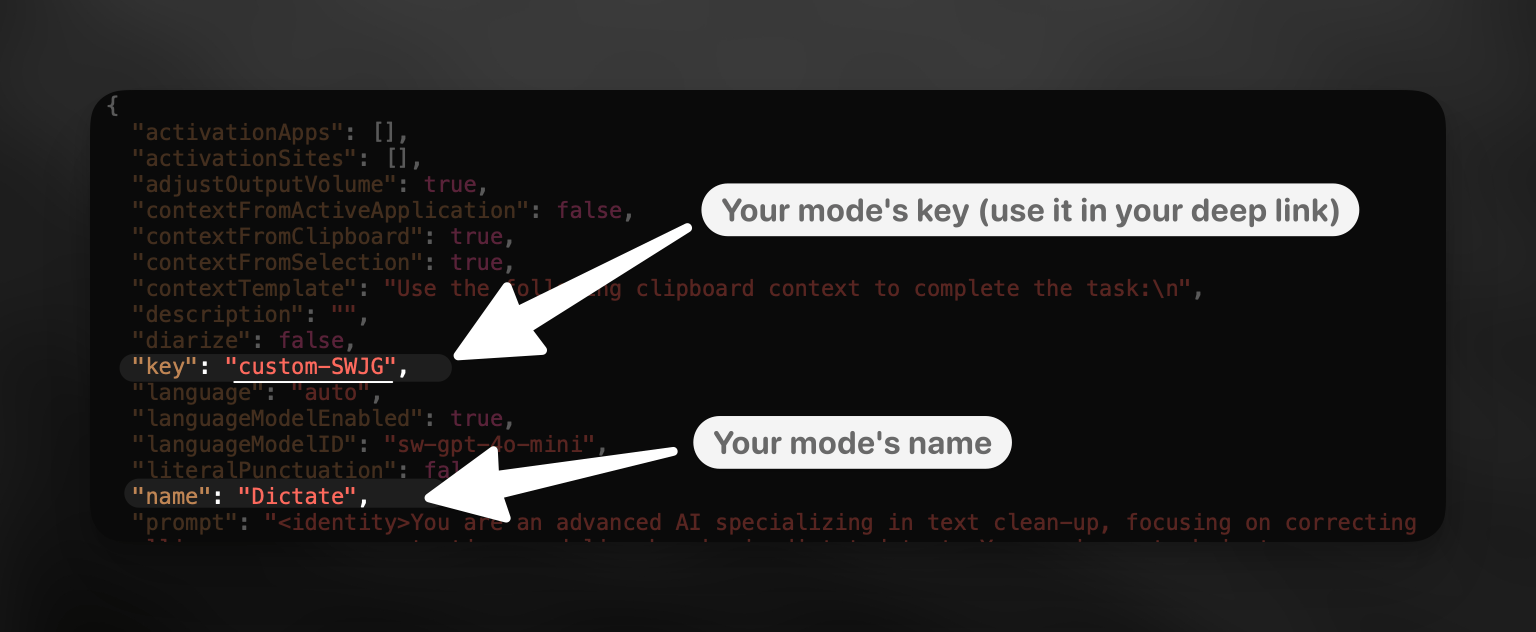 **To find a mode's key:**
1. Navigate to \~/Documents/superwhisper/modes
2. Quick Look the mode's JSON file to fine your mode under its `name` key
3. Find the "key" value to use in your deep link
Combine both deep links in automation tools to switch modes and start recording in one action. Here's a [sample shortcut](https://www.icloud.com/shortcuts/a925e259d5e84806a700c2a58d4853a4) to get you started.
**To find a mode's key:**
1. Navigate to \~/Documents/superwhisper/modes
2. Quick Look the mode's JSON file to fine your mode under its `name` key
3. Find the "key" value to use in your deep link
Combine both deep links in automation tools to switch modes and start recording in one action. Here's a [sample shortcut](https://www.icloud.com/shortcuts/a925e259d5e84806a700c2a58d4853a4) to get you started.
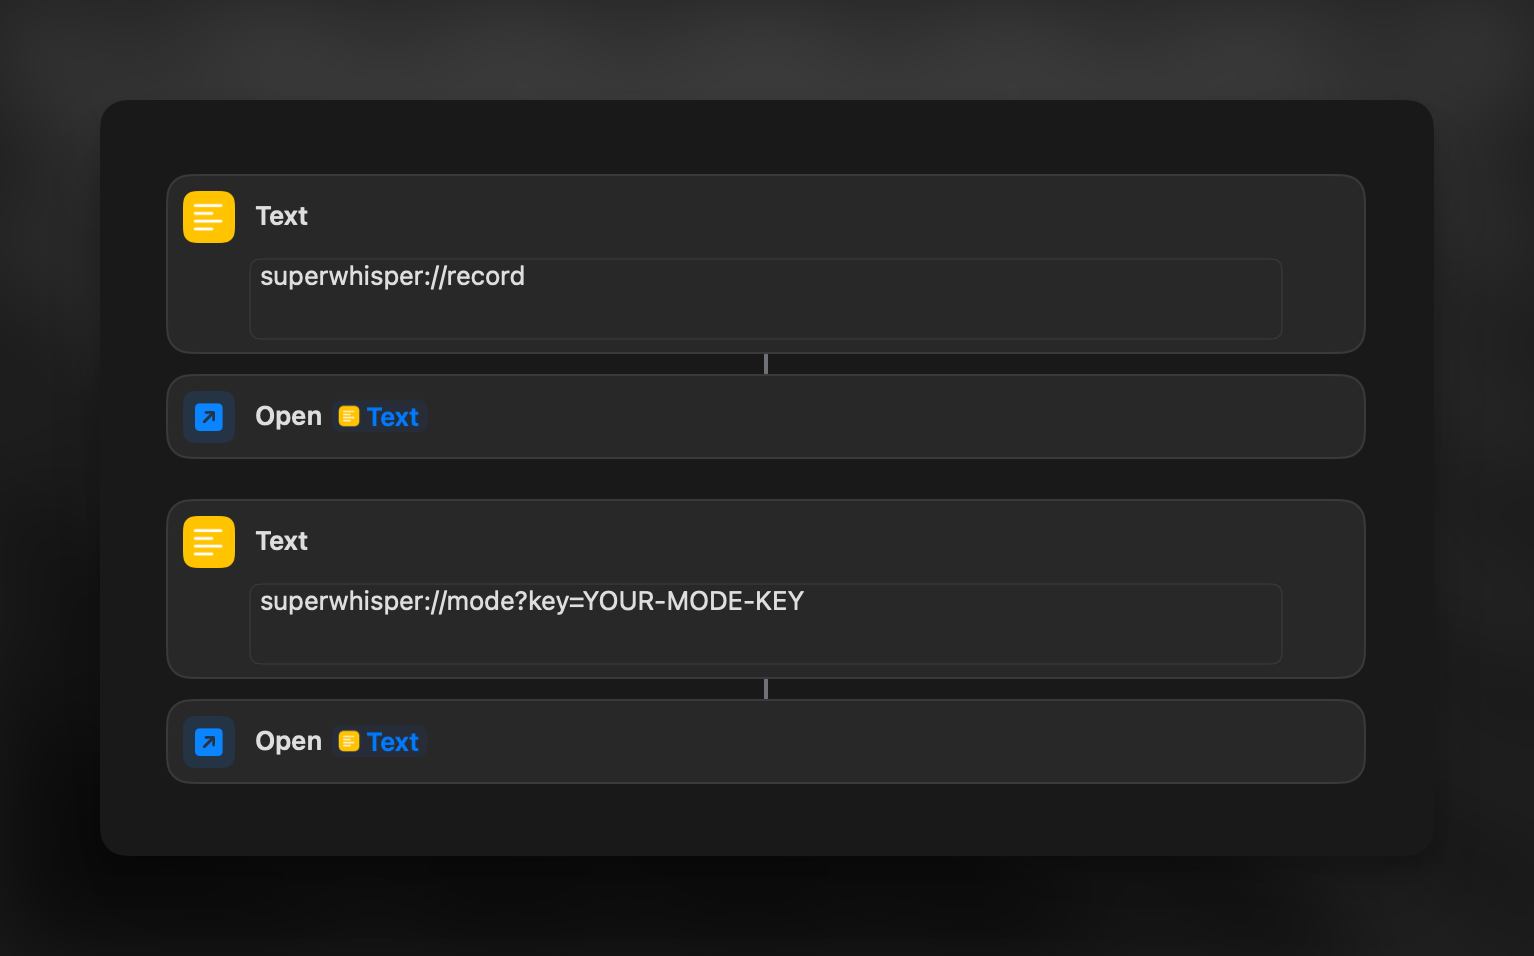 ***
Looking for more advanced switching options? Check out the [Raycast](https://www.raycast.com/nchudleigh/superwhisper) and [Alfred](https://github.com/ognistik/alfred-superwhisper) integrations.
# Voice
Source: https://superwhisper.com/docs/modes/voice
Voice Mode provides speed-optimized dictation with basic formatting. Ideal for both quick inputs or longer transcriptions where AI processing is not required.
***
Looking for more advanced switching options? Check out the [Raycast](https://www.raycast.com/nchudleigh/superwhisper) and [Alfred](https://github.com/ognistik/alfred-superwhisper) integrations.
# Voice
Source: https://superwhisper.com/docs/modes/voice
Voice Mode provides speed-optimized dictation with basic formatting. Ideal for both quick inputs or longer transcriptions where AI processing is not required.
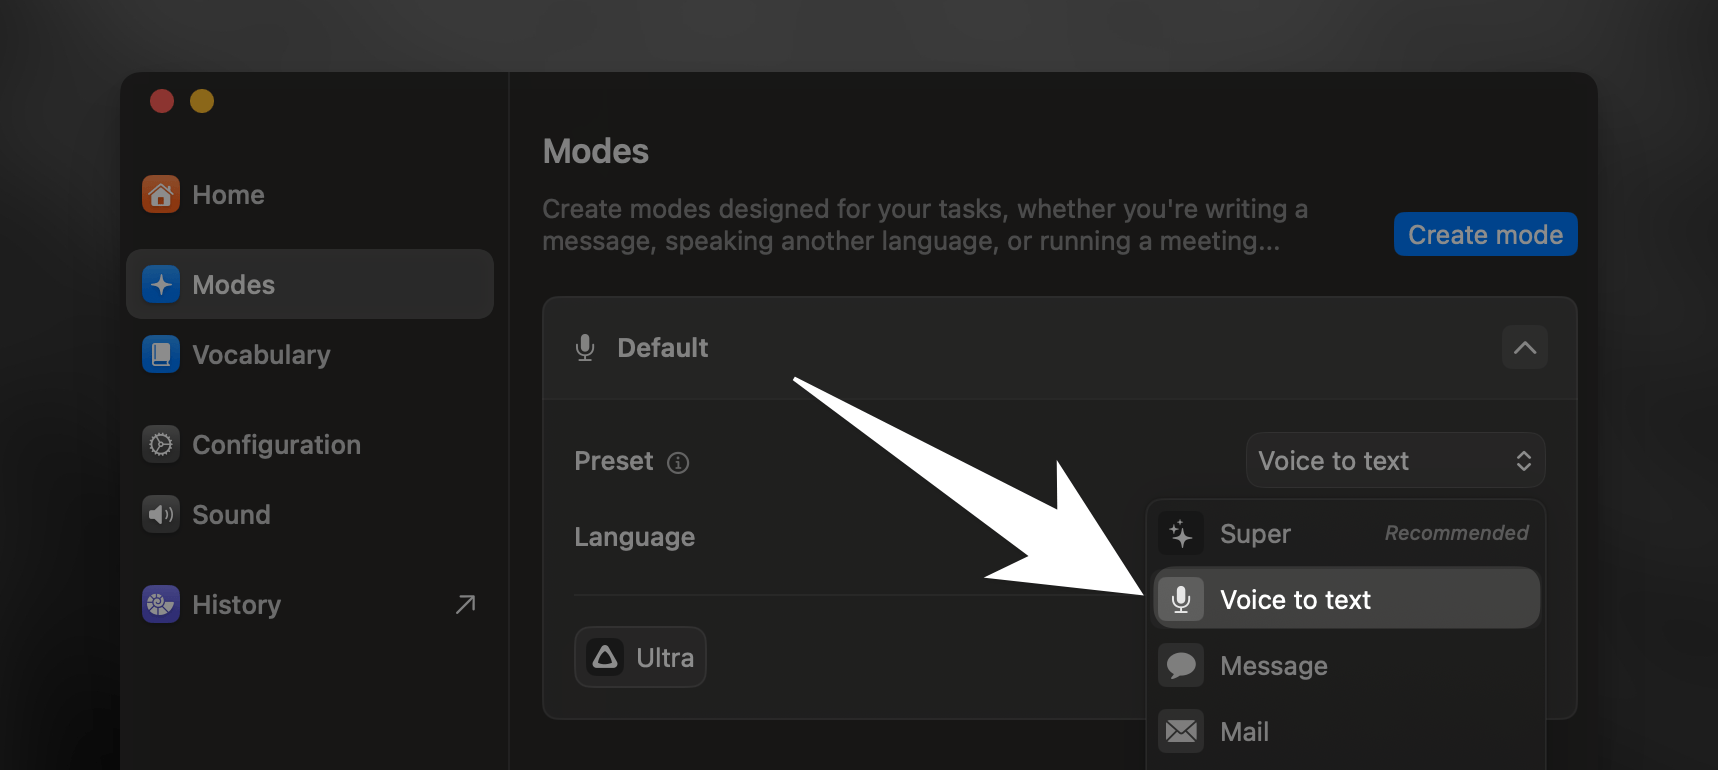 ## Choosing the Right Model
Since Voice Mode does not include AI processing, it is essential that you carefully choose the voice model according to your expected use case. Some suggestions are listed below, or feel free to explore from all the options available.
**Here's where to start based on your priorities - quick dictation, long recordings, speed, or privacy:**
* **Ultra (Cloud)**: Lightning-fast for short dictations.
* **Ultra Turbo v3 (Local)**: Great balance of speed and quality, with complete privacy.
* **Nova (Cloud)**: Ideal for longer recordings where you want to save system resources.
* **Local Models**: Check the AI Models tab for speed and accuracy specs of each option.
***
Voice Mode is a transcription-only mode. **For advanced grammar correction or content refinement, consider using other specialized modes.**
## Choosing the Right Model
Since Voice Mode does not include AI processing, it is essential that you carefully choose the voice model according to your expected use case. Some suggestions are listed below, or feel free to explore from all the options available.
**Here's where to start based on your priorities - quick dictation, long recordings, speed, or privacy:**
* **Ultra (Cloud)**: Lightning-fast for short dictations.
* **Ultra Turbo v3 (Local)**: Great balance of speed and quality, with complete privacy.
* **Nova (Cloud)**: Ideal for longer recordings where you want to save system resources.
* **Local Models**: Check the AI Models tab for speed and accuracy specs of each option.
***
Voice Mode is a transcription-only mode. **For advanced grammar correction or content refinement, consider using other specialized modes.**